Red Clover Components
  • Home
  • About Triplizers
  • Store
    • 144 BCD Triplizer
    • 122 BCD Triplizer
    • 122 BCD Conventional Chainring
    • Triplizer Bolt Kit
    • The Freewheel Key
  • Installation Notes
  • Gallery
  • Blog
  • Useful Links
  • Contact Us

Gearing for L'Eroica, Part I: Double Cranksets

3/2/2015

6 Comments

 
Picture
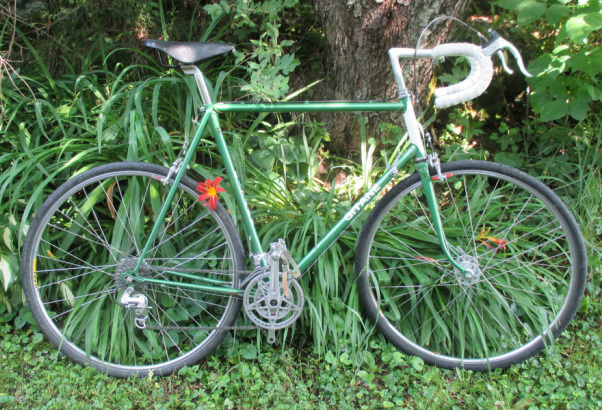
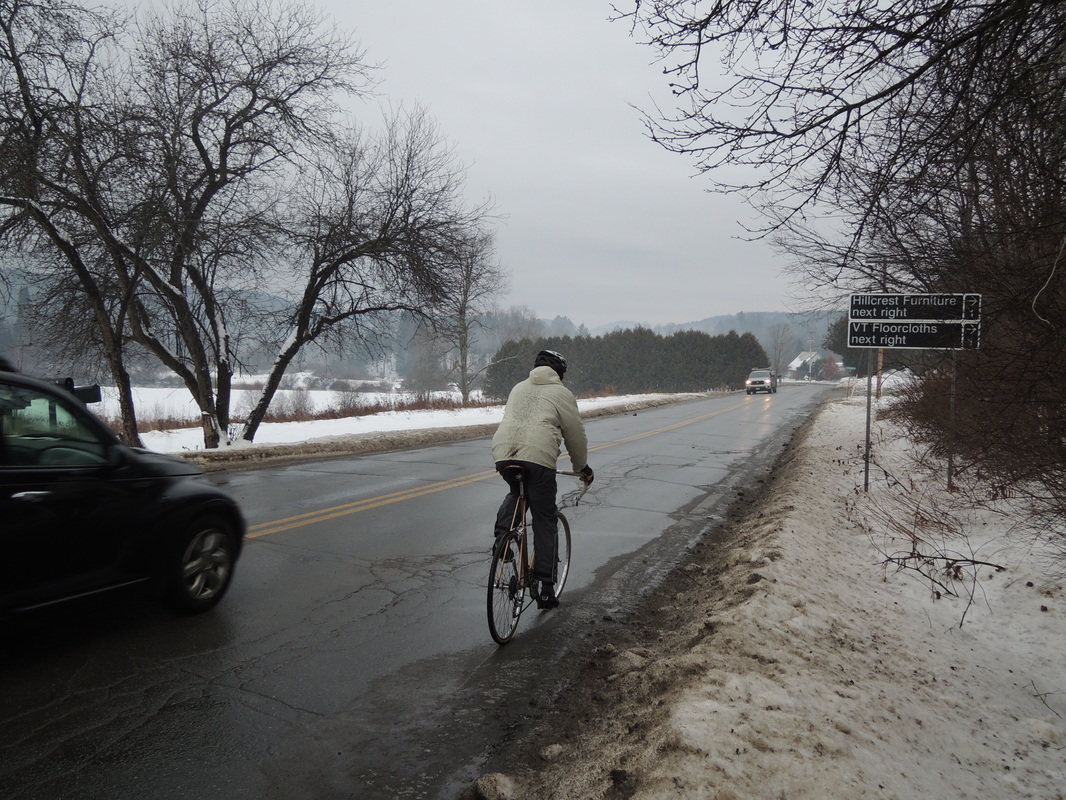
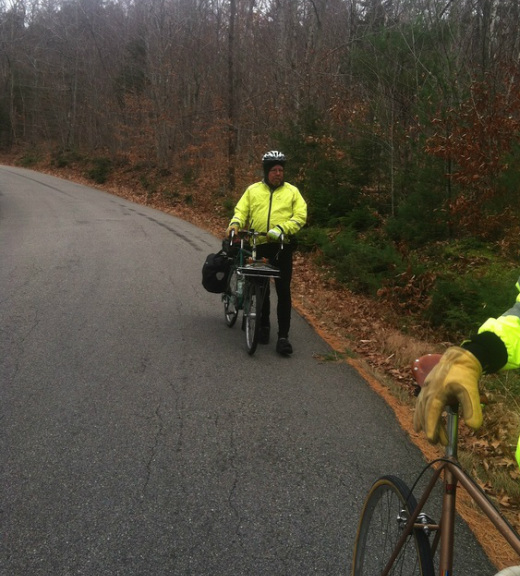
An Eroica ride is a combination costume party, vintage bike show, and a great group ride over a memorable route. Come prepared for some gravel road and dust, as in this segment of a recent ride in Tuscany
Eroica events are mass rides designed to celebrate the heroic age of bicycle racing. The flagship Tuscany ride has been held each October since 1997, but the organizers have since added similar rides elsewhere, including Great Britain, Japan, Spain, and California. (More information on the California ride--which will be held for the first time in mid-April of 2015--is available at http://www.eroicacalifornia.com/.

Because these are vintage rides, they're restricted to road-racing bikes (or at least road-racing type bikes; the rules seem to leave a little wiggle room here) manufactured before 1987. No clipless pedals are permitted, and all bikes must have exposed, non-aero brake cables and down-tube shifters. Wool jerseys, shorts, and similar period dress is encouraged. Riders can choose from three courses ranging from 40 miles or so to a bit more than 120 miles. All include an abundance of hills and significant stretches of gravel road.

The whole thing sounds like a lot of fun to me, and I'd love to ride in one someday. So far, though, my participation has been limited to selling chainrings to riders who are going, and providing some suggestions on modifying their gearing. Here are a few gearing recipes that should work well for those who want lower ratios for an Eroica ride:
PictureChart 1. This brutal set of ratios is the actual catalog spec for the 1974 Peugeot PX-10. That's a 57-inch low gear! That was too high for even the younger version of me, and it's way too high for the current one.


122 BCD Doubles with French Derailleurs

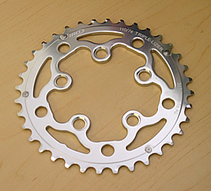
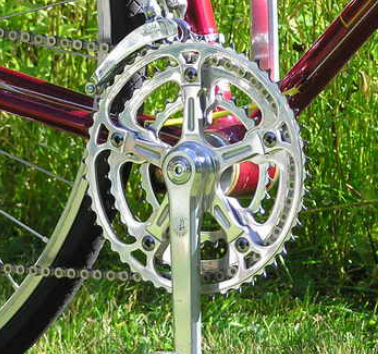
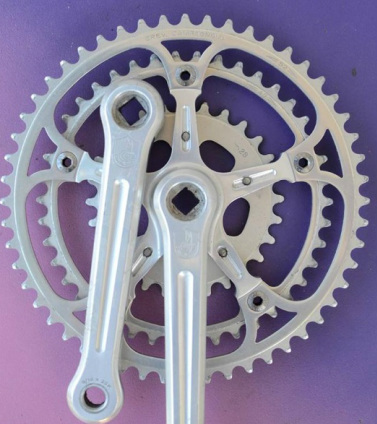
If your vintage ride is a 1960s or 70s French-made road racing machine, there's a good chance that it came equipped with a Stronglight Model 63, 49D, or 93 crankset, all of which accept 122 BCD chainrings.

Rings as small as 37 teeth are possible in that size, although the smallest that Stronglight officially made was a 38-tooth version. But many, if not most Stronglight doubles of that era left the factory with 52-45 rings. When coupled with the typical narrow-range freewheel the resulting gearing is heroic indeed (see Chart 1). The 57-inch high is just too tall a gear to carry most non-racing cyclists over long climbs without a lot of suffering, and probably some walking.

Picture
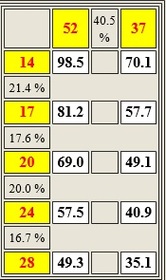
Chart 2. To get seven unique, evenly-spaced gear combinations from this setup, stay on the big chainring through the first three or four freewheel cogs, then double shift by dropping to the small ring in front and shifting to the 17- or 20-tooth cog in back.
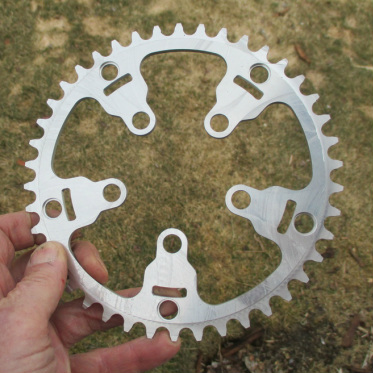
The first possible solution is about as easy as it gets--just swap out the original inner chainring for one of our 37-tooth rings, and replace the narrow-range freewheel with a readily-available 14-17-20-24-28 cogset.

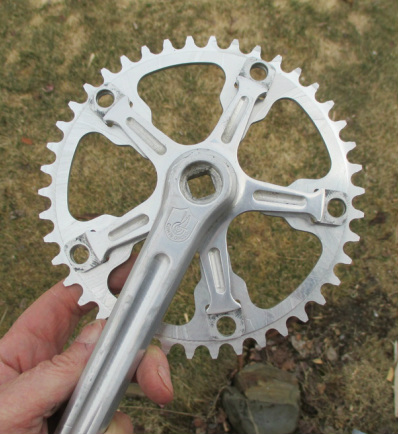
The resulting gearing, charted at left, is much more humane. The Simplex "Prestige" rear derailleurs supplied with most French (and many non-French) bikes of this era have the capacity to handle this setup with ease, provided that the chain is no longer than necessary to handle the 52-28 combination.

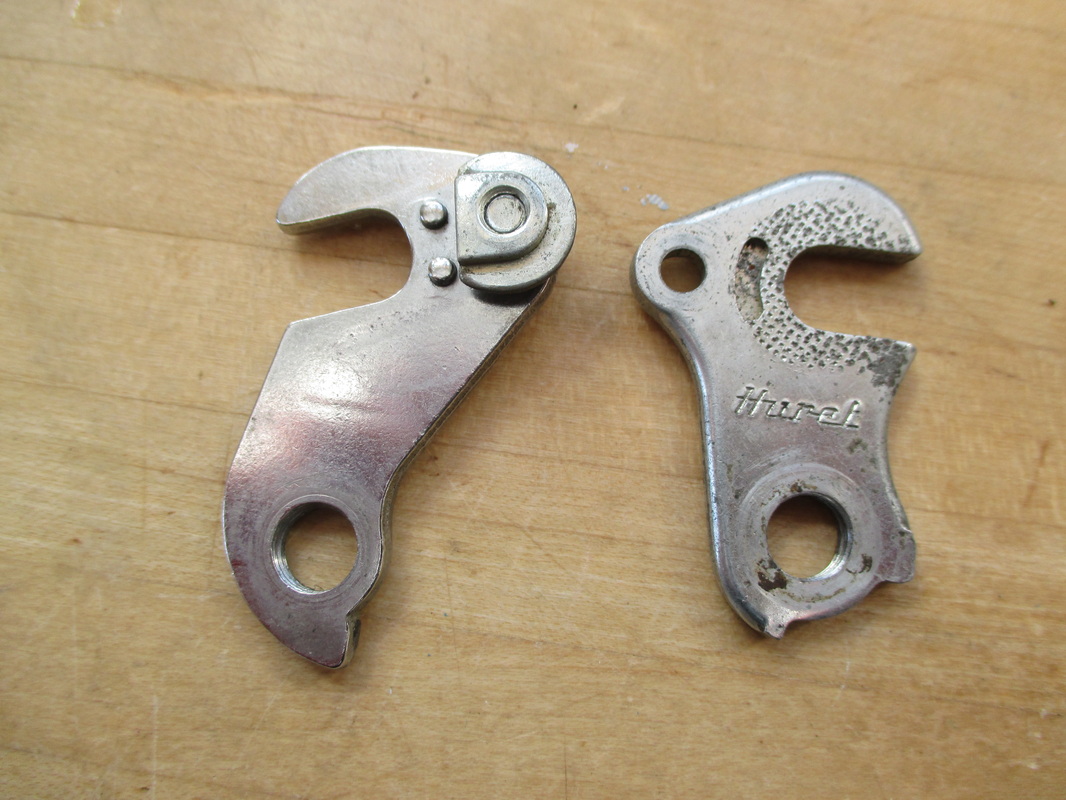
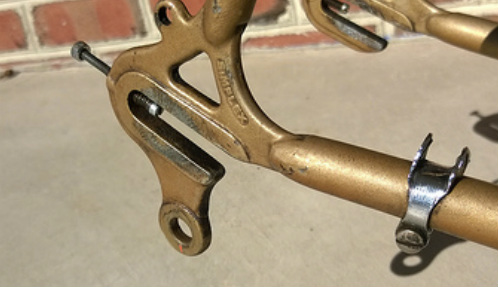
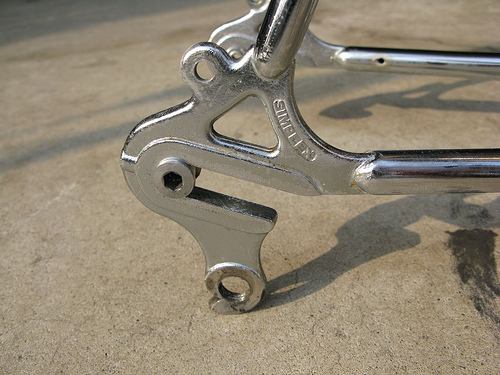
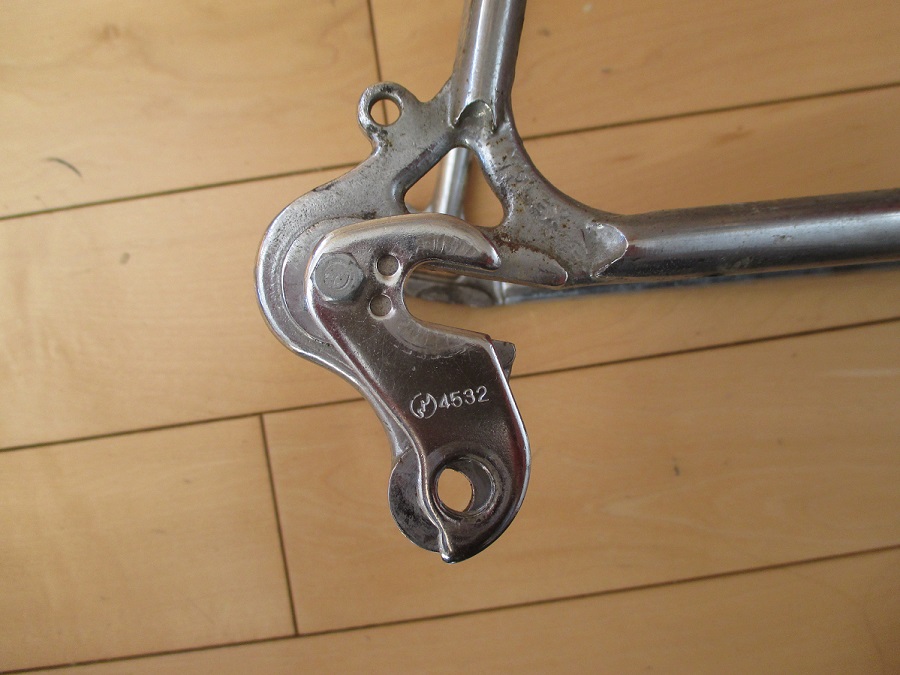
It's a good thing, too, because changing rear derailleurs on an older French bike can get complicated. (For more on this, see the earlier blog post "Derailleur Hangers Demystified.)

Picture
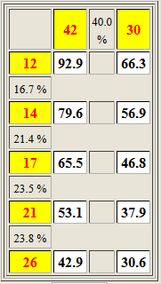
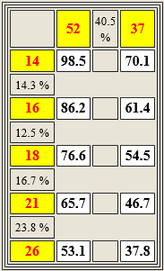
Chart 3. The tighter freewheel called for by a Campagnolo Record derailleur yields even spacing between gears, but slightly higher ratios compared to the setup in Chart 2, above.
122 BCD Doubles with Non-French Derailleurs

For bikes with 122 BCD cranksets and Campagnolo Record derailleurs,the situation is slightly different. The crankset will accept a replacement 37-tooth inner ring in front, but the 28-tooth freewheel cog may be a bridge too far for the rear derailleur.  Some Campagnolo Records will shift onto a cog of that size with ease, while others will clatter madly and fail to get over the hump.

The ability—or inability—of a Record derailleur to handle a 28-tooth cog depends the length of the derailleur hanger and perhaps other factors. The best way to determine whether the combination will work on a given bike to bolt it on and give it a try. If it does make the shift, be aware that the combination of a 14-28 freewheel and 52-37 front exceeds the total  capacity of the Campy Record rear by several teeth, meaning that the chain will hang a bit slack in the small-to-small 37-14 combination. But provided you stay out of that gear (as you should anyway, since it forces the chain to run at an extreme diagonal) you should be fine.

If a 28-tooth doesn't work with your setup, a 14-26 freewheel almost certainly will, although--as you can see from Chart 3--that will take a couple of gear-inches off your low.

Another choice is to replace the original Campagnolo Record cage with an aftermarket long cage from Soma Fabrications, which will reportedly handle freewheel cogs of up to 32 teeth. (You can find more information on Soma cages here. I haven't yet had a chance to try one myself, but I've heard good things about them.)


144 BCD Campagnolo Doubles

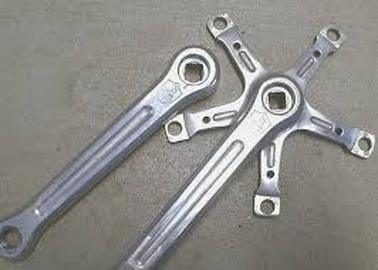
The 144mm bolt circle diameter Campagnolo used for its Record and Nuovo Record cranks from 1967 until well 1985 or so limits the user to cranks of 41 teeth or larger. Practically speaking, that means 42 teeth, since 41-tooth rings are scarce, costly, and in any case pretty much indistinguishable from 42s when climbing a hill.

Combining a 42-tooth small ring with a 26-tooth freewheel cog (which, as we’ve seen is the largest that a stock Campagnolo Record derailleur will reliably handle) gives you a low gear of about 43 gear inches. If you’re determined to keep the Campagnolo double crank, the only way you can go lower is by switching to a higher-capacity derailleur (or the Soma aftermarket cage mentioned above) and a wider-range freewheel.

PictureIf you can live with a 93-inch high gear (like the preceding charts, this one assumes 700 wheels and tubular tires; with beefier clinchers all the ratios will be a bit higher), you can put together a home-brewed compact double with a triplizer ring and the 74 bcd inner ring of your choice.

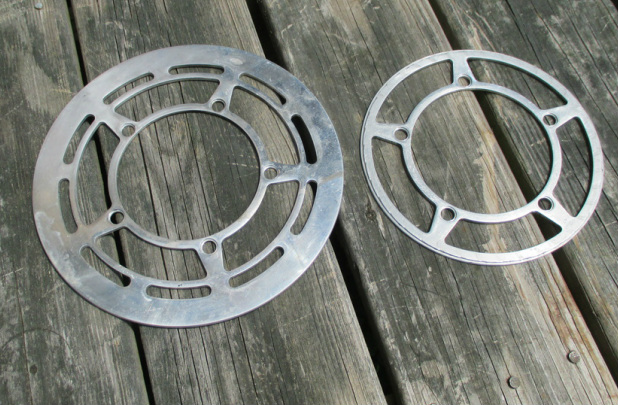
Unless, that is, you’re the mechanically adventurous type, and want to assemble what could be described as a “triplized double:” This involves installing a triple bottom bracket spindle and mounting a triplizer ring and attached granny ring in the inner position, with a toothless “bash guard” in place of the usual outer ring. I’ve done this with a Stronglight 93 crankset—it’s described in detail in the blog post “Installing a Triplizer as a Compact Double”—and there’s no reason it shouldn’t also work with a Campagnolo crank.

But really, if you’re going to install a spindle suitable for a triple crank—as the Chart 4 setup requires—it probably makes more sense to install a third chainring in place of the bash guard and get the even wider gearing range.

I’ll discuss some Eroica-appropriate triple setups in my next post.


6 Comments

Some Thoughts on Spelling, One-of-a-kind Chainrings, and Non-Red-Clover-Components Triplizers

11/17/2014

7 Comments

 
PictureA 110 BCD triplizer from Interloc Racing Designs. The design is a little swoopy for my taste, but it does the job.
The Red Clover Components site has been on its feet for just over a year now, and has had enough visitors that it pops up at the top of the results page when you go to Google and type in the word “triplizer.”

On the other hand, the variant spellings “triple-izer” or “tripleizer” don’t take you there so directly. I might be able to help the search engine along by including those spellings on the site from time to time, but I've resisted doing that because I don’t like either one.

The first is awkward, and the second—if you adhere to the sturdy old i-before-e-except-after-c rule—would be pronounced “triple-azer.” (Or—if you follow the example of the word “seize”—“triple-ezer”.) After 30 years as a writer and editor, it’s hard for me to deliberately misspell a word, even if it works to my benefit.

My top-of-the-search-results position means that I also hear from quite a few riders who want to know if I’d consider making  46-tooth 151 BCD triplizer for pre-1967 Campagnolo cranks, a 38-tooth 128 BCD triplizer for an old Nervar crank, or maybe a 35-tooth standard ring for a 116 BCD 3-bolt Campagnolo crank.

The answer, I regret to say, is “no.” It evidently is possible to run a successful small business machining one-of-a kind rings on a custom basis--Highpath Engineering in Wales once offered this service—but that’s not a business I know how to make work.

So although I may expand my product line a bit someday, for now I’m only making three specific rings—two triplizers and one low-tooth-count inner ring for a double—that have fairly broad appeal for old-bike nerds, which allows me to make them in batches of a couple of dozen or so at a time.

Oh, what the hell! Make that “two tripleizers or triple-izers and one low-tooth-count inner ring for a double.”

Google, please take note.

Other Triplizers
In my capacity as Triplizer Czar, I also get fairly frequent inquiries from people looking for triplizer rings for current-production 110, 130, and 135 BCD cranksets. Here I can offer some good news: I don’t make triplizers in those sizes, but only because several other manufacturers already do.  If you’re looking for a triplizer in one of those three sizes, here’s where to find it.


Interloc Racing Designs/IRD (http://www.interlocracing.com/) makes a 110 BCD chainring that comes in 36- and 34-tooth versions. The IRD triplizer is compatible with any five-arm 110 BCD cranks except modern Campagnolo “hidden bolt” models, which have four mounting bolts on a 110 mm circle and the fifth at 112. It accepts any 74 BCD inner ring.

The French component manufacturer Specialities TA (http://www.specialites-ta.com/gb/produits-rte.html) makes a 110 BCD triplizer ring called the Zephyr K, which is available in 36-, 38-, and 40-tooth versions. TA also makes the 130 BCD Alize K triplizer ring—available in 38, 39, 40, and 42 teeth—and the 135 BCD Vento K in 39, 40,and 42 teeth.

All of the TA triplizers have permanently swaged-in-place chainring nuts for the 74 BCD inner ring. That makes assembly a bit easier compared to the IRD and Red Clover Components triplizers, which use separate inner nuts, but if you manage to strip one of them you're out of luck.


None of the TA triplizer rings seem to be readily available in the U.S., although several online retailers in France and the U.K. will apparently ship them internationally. If you’re sufficiently determined and not in a big hurry for delivery, you should be able to find a source with the help of our old friend Google.

Finally, Stronglight (http://www.stronglight.com) makes what it calls an “intermediare porteur triple” (a phrase unhelpfully translated by Babelfish as “triple bearing intermediate”) for 130 BCD cranksets. It comes in an unusually wide range of sizes: 38, 39, 40, 42, 44, and 46 teeth, making it a promising candidate for some half-step-and-granny setups. It’s  carried by XXcycle (http://www.xxcycle.com), a French online retailer that I’ve had good experiences with when ordering some other hard-to-find components.

Cognitive Dissonance
Unfortunately, pictures of the Stronglight triplizer leave me baffled. It seems to me that the inner arms on the chainring—which contain the mounting holes for the inner granny ring, and are aligned with the outer 130 BCD mounting holes—would unavoidably  interfere with the “ledges” found on the inner face of most crankset spiders. (The Red Clover Components 144 triplizer—like the now-discontinued TA triplizer of the same size--uses a similar in-line design, but incorporates a rectangular “window” to accommodate the crankarm ledges.)

I can imagine that the Stronglight triplizer would work if those crankarm ledges were removed with a grinding wheel. But I can’t imagine that a manufacturer of Stronglight’s stature would sell a chainring that requires structural modifications to any crankset meant to accept it.

Is there anyone out there who has actually used Stronglight’s intermediare porteur triple?  If there is, please get in touch and explain to me how it works. My curiosity is strong on this point--although not quite strong enough that I’m ready to buy one of the rings and puzzle it out for myself.

Picture
What am I not understanding here? How can this possibly fit on a standard crankarm spider?
7 Comments

Installing a Triplizer as a Compact Double

7/8/2014

1 Comment

 
I’ve been asked several times lately if it’s possible to attach a triplizer—either the 122 Stronglight version or the newer 144 version—to the outer position on a crankarm, then bolt a 74 BCD inner ring to the triplizer to create a compact double with a 42-tooth big ring.

That just won't work. The space where the inner ring would fit under that scenario is already occupied by the crank spider arms. (In fairness to the questioners, that problem is immediately apparent if you hold a crankarm and a triplizer in your hands, but it’s a lot less obvious when you’re picturing the situation in the abstract.)

Picture
With a suitable chainring guard and a triplizer ring, any Stronglight 93 crank can be set up as a double with much lower gearing that you could get with conventional rings. The catch is that you're limited to 42-tooth big ring and an inner ring ranging from 26 to 34 teeth. It works well, and to my eyes the setup even looks pretty good.
But cheer up! You can do pretty much the same thing by mounting a triplizer and an attached granny ring in the usual inner-ring position, using the same spindle or bottom bracket cartridge you’d ordinarily use for a triple.

If you’re not the fussy type, you can just leave off the outer ring altogether and secure the triplizer with a set of single-ring chainring bolts instead of the double-ring bolts you’d use if you were including an outer ring. After bolting the assembly in place, all you have to do is adjust high-gear limit screw on the front derailleur so it won’t shift onto the now-absent outer ring before riding happily off into the sunset.

The only drawback to that approach is that it looks just awful to run a crankset—especially a nice-looking vintage crankset—without an outer ring. The usual way around that is to install what’s various known as a bash guard, pants guard or chainring guard in the outer position. That used to be a fairly common setup back in the 1960s and 70s. Stronglight actually made a great big chainring guard that came as standard equipment on the Raleigh Super Tourer, among other bikes. Whatever you call it, it’s basically just a toothless chainring, sized to be slightly larger than the next ring inboard. (If the chainring guard is too large, it will get in the way of the front derailleur and prevent the chain from shifting onto the large ring.)


Picture
Here's a Model 93 with an old-school Stronglight chainring guard mounted in place of an outer chainring. The chainring guard and both inner rings--a 52 and a 42--are mounted on the same set of extra-long chainring bolts. The guard and big ring are separated by the crankarms, and the inner ring stands off from the outer with a set of spacers. See how the front derailleur just clears the edge of the chainring guard?
Picture
Compare the original-style chainring guard to the homemade version at right. Using the big one with a 42-tooth ring would have necessitated mounting the front derailleur much too high to be functional. I fashioned the smaller guard by cutting the teeth from worn-out a 47-tooth chainring. A lathe would have been faster and neater, but as a character-building exercise I did the job with a hacksaw and a file.
Being an inquisitive guy, I recently set up one of the bicycles in the Red Clover Components Test Fleet with a homebrewed compact double setup, using a 42-tooth triplizer and a 28-tooth small ring. I had an original 70s-vintage Stronglight 122 BCD chainring guard--and a big dinner-plate sized chunk of aluminum it is--but since it was designed for 52-tooth ring, it was no use to me here.

Instead, I improvised one of the right size by digging up a worn-out 47-tooth 93-pattern chainring, cutting off the teeth one by one with a sharp hacksaw, and carefully rounding off the resulting rough edge with a double-cut file, followed by a single-cut file and some fine emery cloth. The whole process only took about an hour, and to me the result looks pretty good.

Assembling the inner ring, triplizer, and chainring guard was a snap—the whole thing just bolted together.


Picture
Here's a view of the setup from the back side. Notice how the triplizer ring and chainring guard are mounted on the same set of bolts, with the inner ring on its own smaller bolt circle. The toothless 47-tooth ring is just the right size to cover the 42-tooth triplizer. A 48 would probably also have worked, but a 50 would have been too big. If you look closely you can see that the 47-tooth ring (now the chainring guard) must have been run for a long time with a badly worn chain--the chain sideplates wore little scoops in the edge of the chainring below the level of the original teeth.
I installed a 7-speed 13-15-17-19-21-24-28 freewheel in back, mostly because I happened to have one handy. With the 42-tooth triplizer ring in front, that gives a high gear of only about 86 gear inches with 28C tires. That would be too low for a lot of people, but I’m old and feeble—the gearing on most of my bikes tops out in the high 80s or low 90s—so it’s adequate for my needs. Rejiggering the gear ratios for a 12-tooth small cog (as I probably will when I have the chance) would give a high of 93 or so; an 11 would bring it up to 102 gear-inches. The setup I chose gives a nice even gearing progression, with a double shift in the middle from the 42-21 combination to the 28-17 then back up to the 28-28 from there.

After bolting on a circa 1981 mid-cage Suntour Vx in back and a matching front, I took the bike out on a hilly 25-mile test run. The rear derailleur shifted perfectly, as I had expected. And I was pleasantly surprised by the crisp, accurate shifting in front.

Why surprised? Conventional wisdom says that a front derailleur should work best when the curvature of cage--as viewed from the side--conforms closely to that of the outermost chainring. Like most road fronts, the Vx was apparently designed for use with a 52-tooth big ring; in the photos at the top and bottom of this page you can see that it describes a significantly larger arc than the smaller 42-tooth ring I actually used.

Even so, it shifts just fine. I can't say for sure that the same setup would work equally well with any front derailleur meant for a road double, but my guess is that most road doubles should work.  

Although I haven't tried it yet, I'd expect the same compact double configuration to work nicely with a 144 triplizer in a Campagnolo crankset or Campagnolo clone. As it happens, an Oregon company called BBG Bashguards (http://www.bbgbashguard.com/Cyclocross.html) seems to make a reasonably-priced 144 BCD bash guard sized for use with a 42-tooth ring. That could do away with the need to fabricate one from an old chainring, making the 144 conversion even simpler.


Picture
I know this photo makes the fork look a little bit bent. But believe me, it's really not.
1 Comment

Triplizing a Campy Double: You Pays Your Money and You Takes Your Choice

5/4/2014

13 Comments

 
In my opinion, a triplizer ring is the best way to add a third chainring to Campagnolo cranksets—or Campagnolo clones—that use the old Campy 144mm bolt-circle diameter. No surprise there, since I’m just completing a first production run of 144 BCD triplizer chainrings based on a similar but no-longer-available ring once manufactured by TA (see preceding post).
Picture


Here's Nuovo Record crank fitted with a  conventional outer ring made by TA, a TA triplizer ring in the middle position, and a TA granny ring bolted to the triplizer. Note how the "arms" of the triplizer ring are slightly wider than the crank spider arms themselves. This shows most clearly at the arm in the 9:30 position.

Thanks to Bob Merrill at The Freewheel Spa for the photo.


But I will point out that there’s also another well-established method of adding a small granny ring to 144 Campy crank arms: You can have the drive-side crankarms drilled and tapped to receive special conversion bolts that make it possible to mount a small inner ring.

Bob Freeman at Elliot Bay Cycles in Seattle (elliott baybicycles.com) has been doing this conversion for the last twenty years, and has a reputation for doing great work. A nice step-by-step pictorial of the conversion process is available at https://www.flickr.com/photos/8379107@N03/sets/72157622574585267.)

[Update as of November, 2018: Although Elliot Bay Cycles closed for good in September of 2014, Bob is still drilling cranksets in his home shop. He can be reached by email at rdf1249@aol.com. He's also offering CNC-machined 30-tooth rings for stock Campy triples in the original 100mm BCD.]

Tighter Spacing
In one important respect, Freeman's approach is an improvement on factory-made
Campagnolo Record triples, which were manufactured from about 1973 until the mid-80s. Those original Campy triples used the same basic design and mounting-bolt system, but were drilled for inner rings with an oddball 100mm BCD.

Rings in that size were available only from Campagnolo, and only in a 36-tooth version. Framebuilder and machinist Jim Merz later produced aftermarket rings in sizn to 31 teeth. (For an interesting look at the history of crankset design—and why Campagnolo, among others, once seemed to have so little interest in offering reasonably low gearing—see http://janheine.wordpress.com/2011/09/07/history-of-aluminum-cranks.)


But when mounting bolts are tapped into an existing double crank, their placement is somewhat flexible. It's possible to stay with the old Campy 100 BCD standard if originality is the goal, although in that case it would probably be better to find a factory-produced triple. The old 84 BCD standard used by Stronglight and SR until the mid-1980s is another option, and will allow use of inner rings as small as 28 teeth. But the most convenient option by far is to drill for the modern 74 BCD standard, which allows the modified crank to accept a wide range of currently-manufactured chainrings in sizes down to 24 teeth.


Picture


A factory-drilled Record Triple, made for the exclusive-to-Campy 100 BCD inner ring. Note how the fluting on the crankarms stops short of the bolt holes.

Photo lifted from Ebay.


Things to Think About
As best I can judge (but remember, as a guy who make triplizer rings I'm hardly impartial), here are the pros and cons of the two approaches:

Cost: If you buy it directly from me, a 144 BCD triplizer will cost you $102. You’ll also need an inner chainring--which will probably cost about $40 if you buy one new--and a $20 set of comventional chainring bolts and 3.8 mm spacers. The inner ring is a stock item--no need to modify it in any way.


[Another update: For the benefit of future triplizer historians, if any, I'm leaving the prices mentioned in the paragraphs above and below as they originally appeared. But needless to say, it's not 2014 anymore. Current prices for my stuff appear under the "Store" tab on my web site. You'll have to contact Bob Freeman directly to get his]

Elliott Bay charges $40 for drilling and tapping the crankarm, plus another $40 for the specialized 6mm conversion bolts needed to fasten the inner ring to the arm. They’ll provide a generic inner ring in 28-30 teeth for $30, or a TA ring in 26-32 teeth for $60. That includes drilling and counterboring the holes in the inner ring from the original 8mm to 10mm, as required by the conversion bolts. If you later want to switch inner rings, you'll have to take the new ring to a machine shop and have it drilled out the same way.

In either case, you'll also need a new, longer bottom bracket. A modern square-taper Shimano cartridge bottom bracket--at $20-30--is the most economical option. If you have an existing cup-and-cone bottom bracket you're happy with, you may be able to find a longer spindle that will allow you to keep using it, although mixing and matching between manufacturers may take a fair amount of trial and error. (See the "Installation Notes" section of the web site for more detail on this.)

Flexibility: For the time being, at least, the 144 triplizer will be available only in the 42-tooth size. That should work for most users, but those who want a 44-, 46- or 47-tooth triplizer ring for an old-school half-step-and-granny setup are out of luck, at least for now. I may add rings in those or other sizes later if there’s enough demand.

A drilled crankarm, on the other hand, will accept any size middle ring. Crossover, half-step, step-and-a-half—any sort of wacky setup is possible as long as it’s based on standard-sized middle and outer rings.


Picture


Compare this photo (also shamelessly lifted from Ebay) to the image above. You have to look closely to see it, but here the bolt holes in the crankarms extend through the longer flutings, indicating that they were retrofitted into what was originally a double crank. The holes themselves are spaced for a bored-out 74 mm ring.

The extra mounting holes don't seem to have any effect on the strength of the crankarms of either the factory-drilled or modified versions. I've never heard of one breaking there.

Appearance: To all but the most discerning eye, a drilled Campagnolo double is pretty much indistinguishable from a factory triple.

The "arms" of a triplizer ring, on the other hand, extend slightly beyond edges of the arms on the crankarm spider, giving the assembly a subtly—but if you really look, noticeably—different appearance (see photo at top). That looks fine to me--but of course, it would. What really matters is how it looks to you.

Intangible, But Decisive for Some: Quite a few old-bike dweebs, including me, just don’t like to drill holes or otherwise permanently modify nice old bike parts. They (or I guess I should say “we,”) are happy to make any kind of nut-and-bolt modifications, as long as those changes can later be reversed. If you fall into that camp, you may prefer to bolt on a triplizer ring rather than having holes drilled in an original double.


13 Comments

Finally--a 144 Triplizer Prototype!

4/18/2014

0 Comments

 
Picture


The long-awaited 144 BCD triplizer is here at last. As you can see from the background, the grass has not yet begun to green up in my part of Vermont. If all goes according to plan, I should have a batch of these polished and ready to ship by the middle of May.

The grass will be green by then.


It’s taken me longer than I’d hoped to get to this point, but I now have a prototype of the 42-tooth 144 BCD triplizer. It’s similar to the old TA triplizer of the same dimensions that was discontinued by the manufacturer a few years ago. It should fit any 144 BCD Campagnolo crank and most of its clones

The prototype isn’t polished, and it has some tool marks because we had to start with a piece of 3/16 aluminum and mill it down to 4 mm. The production version will be made from 4 mm stock to begin with, but the metric stock has to be ordered and has about a two-week lead time.

As you would expect, the 4 mm material costs somewhat more than the 3 mm stock used in the Stronglight-type rings, so I’m going to have to charge a little more for the 144 triplizers. Still, the final price will almost certainly be a little less than what the TA triplizers were going for before the supply dried up

While I’m waiting for the material to arrive, I’ll mount the prototype ring on a bike and put some miles on it. I’ll post an update when I’ve had a chance to do that. Stay tuned.

Picture


Here's the prototype ring from the other side, sitting against a circa 1982 Campy crank arm. I've left off the outer ring to make the triplizer easier to see, and left off the bolts out of sheer laziness.

I don't know if you can tell from the photo, but the chainring teeth aren't chamfered yet. The teeth of the production rings will be chamfered as on the original TA rings.


0 Comments

Salada Tea and Mortality

4/16/2014

0 Comments

 
Picture


This isn't the store mentioned in this post. But I think the time period is about right. The railroad-crossing store evidently lacked the "Ceylon" lettering between "Salada" and "Tea," unless those letters had already come unglued before I moved to town.


A close family member once remarked that a USA Today-style pie chart of my brain would consist of three color-coded wedges of approximately equal size, labeled "Bicycles," "Palindromes," and "Other." That assessment is proportionally in the right ballpark, I admit, but it's slightly misleading. The pie-chart model implies that those sectors are completely separate from one another, while the reality is that there's a certain amount of shading from one color into the next

For those who may not know this, I should explain that a palindrome is a word or series of words that’s the same spelled the same from right to left as it is from left to right, as in the word "racecar".

For multiple-word palindromes—something like “navy van,” say—you’re allowed to adjust the word spacing however you want as long the order of the letters is unchanged. That is, although “navy van” spelled backwards is literally “nav yvan,” it’s permissible to shift the space so it reads more naturally. It’s also okay to add or remove punctuation to suit yourself. (I didn’t create those rules, by the way—that’s just the way it is.)

There are a few classic palindromes that just about everyone knows, such as the one about Theodore Roosevelt and the Panama Canal: “A man, a plan, a canal—Panama!” Another has to do with Adam’s supposed first words to Eve: “Madam, I’m Adam.”

The reason that these two are so well known, I think, is that they actually make some sense. Most palindromes that are more than a few words long tend to be kind of sketchy in terms of meaning.
Picture


Compare the stick-on "A" shown here to the letters in the old photo above. You can see from its position that it was originally the second letter in the word "Salada."
The missing letters are still lying on the floor inside unless someone picked them up as they fell.


For example, consider “Draw not New York! Roy went onward.” That’s one of my own discoveries, so I have a certain affection for it even though it’s not the kind of phrase that sees much use in everyday conversation. The same would also have to be said of “Pa, can I repel a leper in a cap?” or “No Geronimo mom in Oregon.”

But the thing is, searching out palindromes is something like panning for gold in a stream without much gold—you have to put in a lot of hours, keep your expectations low, and hope to come up with a small nugget every now and then.

And because you can’t tell what a finished palindrome is going to look like until you’re actually looking at it, a lot of the finds are naturally going to be kind of misshapen. At that point—given the time and effort already expended—there’s a tendency to just file it away and hope that something better will come along eventually.

As a general rule, I don’t do much palindroming while bicycling, mostly because riding a bike is an interesting activity in and of itself. (Long solo car trips, on the other hand, are ideal for palindrome work—lots of signs to look at and not much else to do.)

But you never know when inspiration will strike. A couple of weeks ago I took advantage of an unseasonably warm early-spring day by taking a bike ride over the hill to a neighboring valley and back—a familiar 15-mile loop that I probably ride at least a dozen times a year.

There’s a semi-abandoned old store at what used to be a crossing on the St. Johnsbury & Lamoille County Railroad (people used to say that SJ & LC was an abbreviation for “Slow, Jerky, and Long-Coming.) Many years ago, like a lot of small rural stores, it had a Salada Tea advertisement on both of the windows that faced the road. The white block letters were stuck directly to the inside surface of the glass, with “SALADA” in a curve near the top of the window and “TEA” in a straight line below it.

When I first moved to the area, thirty-odd years ago, the store was already falling into disrepair and the sign was missing a few letters even then. When I first saw it, I think it said something along the lines of “SAL  D    T  A.” Every so often another letter would fall as the place continued its gradual slide toward oblivion.


Picture


Alas! Thirteen down, one to go.


I bet O. Henry could have written a nice short story about this place.


I guess I hadn’t thought about it in some time, but on my recent ride by I happened to notice that there was only one letter remaining—just the first “A” in “SALADA.” For some reason—maybe because I’d just turned 60—that realization filled me with melancholy. While pedaling up the long hill beyond the store, I found myself thinking of the letters falling, unnoticed, one by one, and reflecting on the brevity of human life. I wondered when the last letter would fall, and where I would be when it did. (For more on this theme, go to http://www.online-literature.com/o_henry/1303/ and read the classic O. Henry short story The Last Leaf.)

But as I neared the top of the hill, another part of my brain—which had evidently been clattering away unnoticed for the past mile or so—clicked into gear and delivered a completed palindrome I hadn’t even realized I’d been working on:

 “Salada ad? Alas!”

0 Comments

Derailleur Hangers Demystified

4/2/2014

22 Comments

 
As long as there are no seriously rusted or seized components to deal with, the “front end” of a triple-crank conversion is pretty straightforward: Remove the crankarms, unscrew the bottom bracket lockring and adjustable cup, slide out the original spindle, and replace it with a longer one of the correct size. Grease the bearings, reassemble and adjust, bolt the triple cranks to the spindle, and you’re done. (The procedure is the same whether you’re installing a conventional triple crankset or a double crank that’s been converted to a triple with a triplizer ring and attached granny ring.)
Picture


The original Simplex rear derailleur on this mid-1970s Raleigh was later upgraded to a better-shifting Suntour  derailleur of about the same vintage. The changeover was simplified by Raleigh's penny-pinching--but ultimately helpful--decision to outfit the frame with a mounting claw instead of a brazed-on hanger.

But the “back end” of a triple conversion—which ordinarily involves replacing an existing mid- or short-cage derailleur with a long-cage model capable of handling the wider-range gearing of the triple—has some potentially confusing variables that I'll make a plucky effort to clarify here.

 
Integral Mounts vs. Mounting Claws

The good news is that if you’re working on a relatively recent bike and components—anything after the late 1980s, say—you can bolt pretty much any derailleur onto any frame, because the interface between them has been almost entirely standard since then.

But of course, most readers of this blog will be retro-grouch types who are likely to be dealing with older equipment. In the 1960s, 70s, and on into the early 80s, the standardization we see today hadn’t yet taken hold, and there were at least three competing systems for mounting rear derailleurs. Each was promoted by a component manufacturer who hoped to lock in future derailleur sales by selling frame makers and the bicycle-buying public on the virtues, if any, of its own proprietary approach.

All three mounting systems were available in two variants: In an integral mount—sometimes called a braze-on mount—the tab that supports the derailleur is a permanent part of the bike’s frame. In bikes that use a mounting claw, the derailleur itself is bolted to one end of a shaped metal plate—the mounting claw—that is itself bolted to the frame at the other end.
Picture
Above, an integral--but not original--derailleur hanger on a Gitane Tour de France. The stock Simplex derailleur was originally fastened to the plain dropout with a mounting claw. The brazed-on Campagnolo hanger seen here was later added by a frame shop before a since-regretted repaint.

Below, the previously pictured Raleigh with the derailleur removed to better show the claw. The bolt to the left of the axle slot is threaded into a specially shaped nut that engages the rear half of the slot.

Picture
In the 1950s and 60s, the mounting-claw system was widely used on bikes of all quality levels. But as time passed, bike manufacturers moved toward integral mounts, beginning with their higher-priced models, and by the mid-to-late 70s, the use of mounting claws was pretty much limited to entry-level and department-store bikes. That may be why so many people look down their noses at them today.

But despite their undeservedly lowbrow image, claw mounts have some real advantages. Since they’re not part of the frame itself, a claw that gets twisted out of shape when the derailleur gets tangled up in the spokes can easily be replaced at low cost (don’t ask me how I know this). The same sort of mishap on a bike with an integral hanger would require having a frame builder cut off the damaged piece, braze on a new one, and repaint or rechrome the affected area.

As an added plus, the hardware that fastens the mounting claw to the to the dropout is generic, so a claw made for one company’s derailleur can typically be exchanged for a mount of another style without a lot of head-scratching.

Picture
Above left, a Campagnolo-type mounting claw, turned over to show the special-purpose nut that engages the axle slot. To its right, a Huret mounting claw (The nut and bolt are interchangeable and work for either style claw).
Campagnolo-Type Mounts
Developed by Campagnolo for its own product line, this type of mount is easily recognized by its 10 mm threaded center hole and a characteristic notch at the seven-o’clock position, which engages the derailleur’s B-limit screw for fine-tuning of its rotational position. Integral Campagnolo hangers were used on a great many Italian bikes, as well as those high-end French ones—like the Gitane Super Corsa—that were originally equipped with Campagnolo derailleurs.

This system has since become the de facto world standard. If your old ride is set up this way, it will (with a few exceptions) accept any non-French derailleur manufactured from 1960 or so to the present. Everyone should be so lucky.

Simplex Mounts
Campagnolo’s chief competitor was Simplex, a French company that went its own way with product design. Simplex mounts are recognized by their more rounded shape and the absence of threading in the mounting hole, since their mounting bolts—unlike Campagnolo’s, which screwed directly into the claw or hanger—passed all the way through the mount and were secured on the inside with a nut. (Some Simplex derailleurs were fastened with a shoulder bolt that was inserted from the back of the dropout and threaded into the derailleur).

There are a couple of other oddities to the Simplex mounting system. Although a Campagnolo-type derailleur can't be mounted directly on an unmodified Simplex mount (more about this in a moment), a non-claw-type Simplex derailleur can be bolted directly onto a Campagnolo mount. This can seem slightly strange, since it involves passing a 9-mm bolt through a 10-mm threaded hole. In practice it works okay, although few people seem interested in this particular component combination these days.

The second oddity is that although Simplex mounting claws are bolted to the dropout with the same generic hardware used for Campagnolo claws, the claws themselves are somewhat model-specific. In other words, there's no universal Simplex claw that will accept any Simplex derailleur. You need to have the correct claw (and the correct derailleur-to-claw mounting bolt) for the particular derailleur you plan to use.

To make matters worse, there seems to be no product marking or numbering system that makes it possible to tell which hanger goes with which derailleur. And some people claim that French bikes are difficult to work on! 


In any event, new derailleurs designed for the Simplex mount haven’t been made for decades. Used examples are fairly easy to come by, but pose problems of their own: Simplex derailleurs were typically made almost entirely from Delrin plastic, which was reasonably tough when new, but now, forty years later, tends to break with discouraging ease.

Worse yet--at least from the standpoint of the recreational cyclist, 
Simplex catered mostly to racers or would-be racers, so most of the derailleurs it did make were short-cage models. In the late 70s and into the 80s—near the end of its corporate life—the company did make a few long-cage models. These turn up on ebay from time to time, but they’re scarce and tend to command high prices.

Picture
Above: A Simplex dropout with the original, unmolested integral derailleur hanger. Note the unthreaded bolt hole and  the absence of any stops or notches, in contrast to the Campagnolo and Huret mounts pictured earlier.

Below: A Simplex hanger--originally similar to the one above--that's been "butchered" to accept a Campagnolo derailleur. The mounting hole has been threaded and a notch has been cut with a file to act as a derailleur stop. (The chainring bolt in the dropout slot has no bearing on the derailleur mount--it's there to serve as a stop for positioning the rear wheel.) Photo courtesy of H. Vanneck.


Picture
So what do you do if you have an original 1960s or 70s frame—maybe a nice Peugeot PX-10—that you want to retrofit with a long-cage derailleur for use with a triple crank? You have at least five options, including a couple of good ones.

The Brutalist Approach: Cut off the Simplex hanger with a hacksaw, then use a file to clean up the cut area, shaping it to match the non-drive side of the rear dropout. Paint or grease the cut and filed surface to prevent rust, bolt on a Campagnolo mounting claw and the long-cage derailleur of your choice, and you’re in business. If done carefully, the result can be hard to tell from a dropout that was manufactured without an integral hanger to begin with. Done crudely, it looks like hell.

Pros: Cheap and effective.

Cons: Widely regarded as a crime against humanity. It may also reduce the bike’s resale value, if that matters to you.


The Modified Brutalist Approach: Bring bike to a good frame shop and have the Simplex hanger cut off and a standard hanger brazed on in its place.

Pros: Difficult to tell from original if done by a skilled professional.

Cons: Costly, since the frame will have to be at least partially re-chromed or repainted where finish is damaged by brazing heat.

The Hybrid Approach: An integral Simplex hanger can be modified to accept Campagnolo-style derailleurs by running a 10 mm tap through the unthreaded bolt hole and filing (or grinding, but be careful) a stop in the body of the hanger, using an existing Campagnolo hanger as a pattern. Again, paint or grease disturbed original paint or chrome to prevent rust.

Pros: Invisible when derailleur is installed. Modified hanger will accept Simplex as well as Campagnolo-type derailleurs.

Cons: May reduce frame’s collector value. Scorned by Francophiles.


The Purist Approach:  Track down a functioning long-cage Simplex derailleur (be aware that this may cost beaucoup d'argent), and install it on the unmodified hanger. (Several vintage non-Simplex derailleurs are also said to be compatible with Simplex hangers that have had a 10-mm tap run through their original 9 mm bolt holes. This will at least spare you the stigma of grinding a stop into the hanger as well. Among these are the Shimano Crane, the Schwinn Le Tour—which was also manufactured by Shimano—and the first-generation Campagnolo Rally. There may be others as well. I have no first-hand experience with any of these, so don’t ask me.)

Pros: No criticism of the purist approach is possible.

Cons: Expensive; limited derailleur options.


The Hermaphrodite Approach: Leave the integral Simplex mount alone, and mount a standard derailleur claw on the dropout in the usual manner/

This sometimes takes a little fiddling. Some claws have a sort of S-shape when viewed edge-on, allowing the derailleur to sit a little closer to the freewheel than it otherwise would. But this can cause interference between the claw and the integral hanger.  A flat mounting claw will usually avoid this problem, but if the derailleur mounting bolt is long enough to protrude through the back of the claw, it may bear against the integral mount beneath and make it impossible to tighten the bolt all the way. This can be addressed by switching to a derailleur with a shorter bolt, or grinding or filing the end of the bolt enough to eliminate any interference. Adding a washer between derailleur and claw may also work, although this will sometimes move the derailleur far enough outward that it will lack enough travel to shift onto the largest freewheel cogs.

Pros: Cheap and fast; leaves integral hanger intact for the benefit of generations as yet unborn.


Cons: Presence of both integral hanger and claw is not noticeable unless you look closely, but the knowledge that both are there may lead to persistent low-grade angst on the part of some riders.
Below, a Campagnolo mounting claw attached to a frame already outfitted with an integral Simplex hanger. The resulting assembly looks a little strange before the derailleur has been installed, but it's scarcely noticeable afterwards. Note that the length of the derailleur mounting bolt can't exceed the thickness of the claw, or it will press against the integral hanger behind the mounting hole and prevent it from tightening all the way.
Picture
Huret Mounts
Huret, another bygone French component manufacturer, also had its own proprietary derailleur mount. As you can see in the photos above, it's superficially closer in appearance to the Campagnolo hanger than the Simplex version. The threaded mounting hole accepts a standard 10 mm bolt, but the notch that serves as a stop is located at about four o’clock, rather than seven o'clock.

A Campagnolo-type derailleur will thread right on to a Huret mount, but will likely sit at a crazy angle relative to the chainstay. The derailleur may even function in this position, more or less, but shifting performance is likely to be lousy.

A Huret hanger can’t be modified to accept standard derailleur by filing or grinding it, as a Simplex hanger can. That leaves you with the choice of cutting it off and using a claw (the Brutalist option), having a frame builder braze on a new one (the Modified Brutalist option), or using the Hermaphrodite approach of keeping the original brazed-on mount while adding a mounting claw.

The Purist approach—finding a Huret-compatible derailleur—can also work, but be aware that just because a derailleur was manufactured by Huret doesn’t necessarily mean that it was designed for the Huret mounting system. The company also made derailleurs for the Campagnolo-style mount. Some models were convertible from one to the other by using special tabbed washers, which came in two different versions. Good luck.
22 Comments

Eight Years

12/24/2013

0 Comments

 
Picture
Heavy late-morning traffic in Lower Cabot, Vermont. I really should have a blinking rear light showing, but I left it home by mistake. The sun is up there somewhere on the other side of a mile-thick layer of clouds.
I went for a short bike ride the other day, on what happened to be the winter solstice. The weather was discouraging. We’d had over a foot of nice powdery snow and some great cross-country skiing, but it had warmed up to just above freezing. It was raining lightly with predicted heavy freezing rain later in the day, followed by days of single-digit temperatures.

Considered strictly as a bike ride, it wasn’t much. I layered on some old clothes, walked my old Univega down the steep dirt road from my house to the paved road, and headed south to Marshfield village, dodging patches of ice when I could and easing carefully over them when I had to. Once I got to Marshfield, I turned around and rode to Cabot Village. Then I turned around and came home, moderately wet and with a big streak of rear-wheel-spatter up the back of my wind shell. Total distance, including a mile and half of walking up and down the hill: maybe nine or ten miles.

Still, I felt pretty good about the day, because it marked the completion of eight consecutive years of monthly bike rides. Since January of 2006, I’ve gone for at least one ride every month—usually, but not always, with my friend Mark, who has the same streak going that I do. That’s not much of a challenge from about April to November, when I ordinarily ride several times a week. But December, January, February, and March can be problematic. But I’ve developed a few basic rules for winter riding that seem to help:

Rule One: Don’t hesitate. Seize the first day that looks halfway decent, with the roads clear of snow and temperatures above freezing, or at least not too far below freezing.

This is especially important early in the winter. November weather often hangs on into the first week of December or so, and while it’s typically cold and raw (see previous post, “Old Guys, Steep Hills”), it’s a lot better than the solid cold and snow that comes along later. At worst, you’ll take a ride in marginal conditions early in the month and then get a much nicer day later on. If that happens, you can go for another, longer ride. What you want to avoid is passing up a spell of so-so weather and having to go out on January 31 in a stiff wind with the temperature hovering around zero. I’m not speaking hypothetically here.

Rule Two:
Leave the Hetchins in the garage.

Winter riding is hard on a bike, so it’s best to have a dedicated winter beater like my Viva Sport. Sand and road salt and slush gets in everything. When I return from a winter ride, I spend half an hour or so cleaning things off, first by rinsing the whole bike with warm water from a garden watering can (it's best to avoid pressurized water from a hose because it can force water into the bearings). Once the grit and salt are gone, I dry it with paper shop towels and lube the chain, derailleurs, and brakes.

Even so, exposure to road salt probably shortens the life of brake and shifter cables. A singlespeed bike does away with some damage-prone hardware and makes maintenance a little easier. I tried that approach for most of one winter and found that it worked pretty well. Eventually, though, I went back to derailleurs because not having them limited me to flatter terrain, which is in short supply around here. True fact: Vermont is full of unnamed hills and mountains, but the much rarer expanses of flat river-bottom land almost always do have names.

Rule Three: Be visible.

This is mostly a matter of safety, but ego creeps into it, too: The more easily people can see you, the more easily they can marvel at your awesomeness for riding in winter weather.

On the day of my solstice ride, the sun rose at a little after 7:20, set at about 4:15, and between times didn’t get much work done through the heavy cloud cover. A blinking red light in back makes you much more visible, and a white light in front doesn’t hurt, either.

Once the snowbanks start to pile up, visibility at intersections is limited. Keep an out out for traffic approaching entering from driveways and sideroads, and keep your head up. Slow and steady is the way to go in winter. Fortunately—because speed generates a face-freezing wind that discourages further speed—this to be self-reinforcing in cold weather.

I'm a sensitive guy, so I realize that my winter riding experience will leave some readers unimpressed. I mean, what about those Iditabikers in Alaska, where it gets really cold and dark? What about those intrepid winter bike commuters in Minnesota who ride to work and back through the ice and sleet and storm every day all winter, not just one measly day a month? Why bother to even mention my meager experience with cold-weather riding?

In my defense, I will note that because I work at home, the glory of daily commuting is unavailable to me. But I would also argue that the very infrequency of my winter riding is what makes it so… so… well, “heroic” is a strong word, but I can’t think of another that quite fits here.

Think about it: To an experienced airline pilot, landing a Boeing 767 is all in a day’s work. It happens all the time, so no one thinks anything of it. But if both pilots on a particular flight were to be temporarily struck down by a bad batch of chicken salad, leaving a freelance editor to take the controls and guide the plane to safety, that would be news. That brave editor would be lauded, feted, and lionized.

Well, that’s me. I don’t ride often in the winter, and I’m not very good at it, but I keep doing it anyway. Once a month, just like clockwork. You’ve got to admire that kind of determination.

0 Comments

Old Guys, Steep Hills

12/4/2013

1 Comment

 
PictureHurricane Mountain Road summit, November 2013. Left to right: Bruce Davis, Jon Vara, Mark Bromley, Lee Burnett, David Bayne, Chris Tormey. Out-of-the-picture photographer: Bill "William the Recumbent" Birchard.
Northern New England has a lot of steep mountain roads. The toughest of them is the Mount Washington Auto Road in New Hampshire, which climbs nearly 5,000 feet in less than 8 miles, for an average grade of about 12 percent. I’ve never attempted it, because the road is only open to bicycles two days a year, and then only to racers who have coughed up a $350 entry fee.

I did once ride up Vermont's Mt. Ascutney, which gains almost exactly half the elevation of Mt. Washington in almost exactly half the distance. The Ascutney ride is popular with people training for the Mt. Washington race because it’s open to anyone for the cost of a day pass to Ascutney State Park. (Vermont state motto: Freedom and Unity. New Hampshire state motto: Charge Fees or Die.)


PictureTechnically, the scale at the store was for weighing deer (note the bloody patch on the ground). But no one said you couldn't also use it to weigh bikes. Bill's recumbent--that's him shading his eyes at right--was the second-heaviest.
But both roads, and several others like them, dead-end at their respective summits. The steepest road I know of that actually goes anywhere is the Hurricane Mountain Road, which runs from the vicinity of West Fryburg, Maine to Intervale, New Hampshire. Whether you ride it from east to west or west to east, it climbs something like 1,200 feet in about two miles. That’s a little less steep than Ascutney or Washington, but not by much. There are sustained stretches of 17% grade.

In the middle of November, I got together with a group of old friends to do an end-of-the season overnight including some big hills. The plan called for leaving cars at a campground on Maine Rte. 113—which runs along the Maine-NH line, and crosses into New Hampshire in a couple of places—and ride south through rolling country to the base of the Hurricane Mountain Road. After crossing it, our plan was to head north on Rte. 302 and 16 to an overnight stay the Appalachian Mountain Club camp in Pinkham Notch. On Sunday morning, we’d continue north to Gorham and head east on Rte. 2 before picking up 113 again and following it up and over Evans Notch and back to our vehicles.

PictureA vintage Motobecane, wool knickers, and a Swedish Army surplus rucksack, circa 1939. Can it get any better than this?


The weather was about as good as you could reasonably hope for at that time of year—mostly clear, not much wind, with temperatures in the mid-to-high 30s. We reached the base of the Hurricane Mountain Road around noon and began clawing our way up and over.

As an oldish guy who lives at the top of a long, steep stretch of dirt road, I’m not ashamed to run a mountain-bike-style low gear on my road bikes, and on this trip I was glad to have it. I ground to the top in a 30-tooth chainring and a 34-tooth freewheel cog, with my cadence dropping to 45 rpm on the steepest sections. (Yes, I looked it up when I got home—that's about 3 miles per hour.) I had to keep sliding forward to prevent my front wheel from losing contact with the pavement.

PictureSometimes it's best to walk parts of the descent, too. Especially if--like Mark here--your bike is loaded down with every steel touring rack, tool, and accessory known to humanity. The whole rig (excluding rider) weighs 58 lbs. We checked.
Most of the other guys—who, it must be said, weren’t geared as low as I was—ended up walking at least part of the way. No matter. The difference in arrival time between those who walked all the way, those who walked part of the way, and those who rode all the way did no real credit to any of us.

For some reason, the warning sign for the descent of the west side designates it as a 5% grade. Not so—it’s the same 17% as the east side. At two closely-spaced  switchbacks along the way, the grade on the inside of the curves looks more like a cliff than a roadway.

I expected to use my brakes a lot, and did use them a lot.


PicturePerfect coffee-drinking weather at Pinkham Notch on Sunday morning. For riding, not so much.
At the bottom, we ate slices of pizza and and drank bottles of Moxie before turning north, with fifteen miles and a thousand-foot climb still ahead of us. A few pesky mechanical issues surfaced at around this point: Chris broke a derailleur cable, and for lack of a spare had to ride the rest of the route on his 15-tooth cog. I developed a pedal problem (caused, I later found, by the near-simultaneous loss of one SPD cleat screw on each of my shoes) that prevented me from unclipping my right foot or clipping in with my left. On average it was fine. We reached the Notch in fading daylight and spitting snow.

After a pleasant and sociable evening—the ride had been planned to coincide with the annual meeting of the AMC Trail Crew Association—we woke on Sunday morning to three inches of fresh snow. Out with Plan A, in with Plan B. We caught a ride back to our vehicles and declared victory. That's the way to run a bike tour.


1 Comment
Forward>>

    Author

    I'm a chainring czar and editor in Cabot, Vermont. You know, where the cheese comes from.

    Archives

    January 2021
    December 2020
    March 2020
    April 2019
    February 2018
    September 2017
    August 2017
    October 2016
    March 2016
    March 2015
    November 2014
    July 2014
    May 2014
    April 2014
    December 2013

    Categories

    All

    RSS Feed