Red Clover Components
  • Home
  • About Triplizers
  • Store
    • 144 BCD Triplizer
    • 122 BCD Triplizer
    • 122 BCD Conventional Chainring
    • Triplizer Bolt Kit
    • The Freewheel Key
  • Installation Notes
  • Gallery
  • Blog
  • Useful Links
  • Contact Us

Finally--a 144 Triplizer Prototype!

4/18/2014

0 Comments

 
Picture


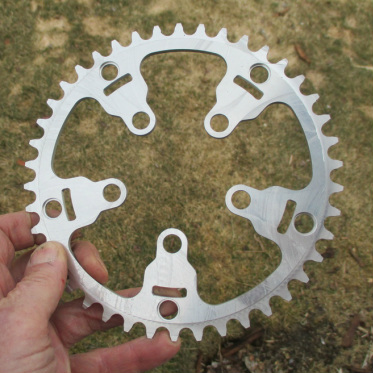
The long-awaited 144 BCD triplizer is here at last. As you can see from the background, the grass has not yet begun to green up in my part of Vermont. If all goes according to plan, I should have a batch of these polished and ready to ship by the middle of May.

The grass will be green by then.


It’s taken me longer than I’d hoped to get to this point, but I now have a prototype of the 42-tooth 144 BCD triplizer. It’s similar to the old TA triplizer of the same dimensions that was discontinued by the manufacturer a few years ago. It should fit any 144 BCD Campagnolo crank and most of its clones

The prototype isn’t polished, and it has some tool marks because we had to start with a piece of 3/16 aluminum and mill it down to 4 mm. The production version will be made from 4 mm stock to begin with, but the metric stock has to be ordered and has about a two-week lead time.

As you would expect, the 4 mm material costs somewhat more than the 3 mm stock used in the Stronglight-type rings, so I’m going to have to charge a little more for the 144 triplizers. Still, the final price will almost certainly be a little less than what the TA triplizers were going for before the supply dried up

While I’m waiting for the material to arrive, I’ll mount the prototype ring on a bike and put some miles on it. I’ll post an update when I’ve had a chance to do that. Stay tuned.

Picture


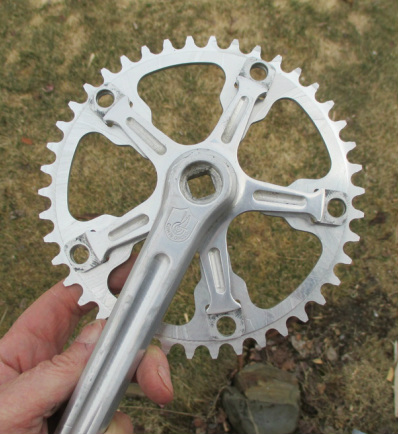
Here's the prototype ring from the other side, sitting against a circa 1982 Campy crank arm. I've left off the outer ring to make the triplizer easier to see, and left off the bolts out of sheer laziness.

I don't know if you can tell from the photo, but the chainring teeth aren't chamfered yet. The teeth of the production rings will be chamfered as on the original TA rings.


0 Comments

Salada Tea and Mortality

4/16/2014

0 Comments

 
Picture


This isn't the store mentioned in this post. But I think the time period is about right. The railroad-crossing store evidently lacked the "Ceylon" lettering between "Salada" and "Tea," unless those letters had already come unglued before I moved to town.


A close family member once remarked that a USA Today-style pie chart of my brain would consist of three color-coded wedges of approximately equal size, labeled "Bicycles," "Palindromes," and "Other." That assessment is proportionally in the right ballpark, I admit, but it's slightly misleading. The pie-chart model implies that those sectors are completely separate from one another, while the reality is that there's a certain amount of shading from one color into the next

For those who may not know this, I should explain that a palindrome is a word or series of words that’s the same spelled the same from right to left as it is from left to right, as in the word "racecar".

For multiple-word palindromes—something like “navy van,” say—you’re allowed to adjust the word spacing however you want as long the order of the letters is unchanged. That is, although “navy van” spelled backwards is literally “nav yvan,” it’s permissible to shift the space so it reads more naturally. It’s also okay to add or remove punctuation to suit yourself. (I didn’t create those rules, by the way—that’s just the way it is.)

There are a few classic palindromes that just about everyone knows, such as the one about Theodore Roosevelt and the Panama Canal: “A man, a plan, a canal—Panama!” Another has to do with Adam’s supposed first words to Eve: “Madam, I’m Adam.”

The reason that these two are so well known, I think, is that they actually make some sense. Most palindromes that are more than a few words long tend to be kind of sketchy in terms of meaning.
Picture


Compare the stick-on "A" shown here to the letters in the old photo above. You can see from its position that it was originally the second letter in the word "Salada."
The missing letters are still lying on the floor inside unless someone picked them up as they fell.


For example, consider “Draw not New York! Roy went onward.” That’s one of my own discoveries, so I have a certain affection for it even though it’s not the kind of phrase that sees much use in everyday conversation. The same would also have to be said of “Pa, can I repel a leper in a cap?” or “No Geronimo mom in Oregon.”

But the thing is, searching out palindromes is something like panning for gold in a stream without much gold—you have to put in a lot of hours, keep your expectations low, and hope to come up with a small nugget every now and then.

And because you can’t tell what a finished palindrome is going to look like until you’re actually looking at it, a lot of the finds are naturally going to be kind of misshapen. At that point—given the time and effort already expended—there’s a tendency to just file it away and hope that something better will come along eventually.

As a general rule, I don’t do much palindroming while bicycling, mostly because riding a bike is an interesting activity in and of itself. (Long solo car trips, on the other hand, are ideal for palindrome work—lots of signs to look at and not much else to do.)

But you never know when inspiration will strike. A couple of weeks ago I took advantage of an unseasonably warm early-spring day by taking a bike ride over the hill to a neighboring valley and back—a familiar 15-mile loop that I probably ride at least a dozen times a year.

There’s a semi-abandoned old store at what used to be a crossing on the St. Johnsbury & Lamoille County Railroad (people used to say that SJ & LC was an abbreviation for “Slow, Jerky, and Long-Coming.) Many years ago, like a lot of small rural stores, it had a Salada Tea advertisement on both of the windows that faced the road. The white block letters were stuck directly to the inside surface of the glass, with “SALADA” in a curve near the top of the window and “TEA” in a straight line below it.

When I first moved to the area, thirty-odd years ago, the store was already falling into disrepair and the sign was missing a few letters even then. When I first saw it, I think it said something along the lines of “SAL  D    T  A.” Every so often another letter would fall as the place continued its gradual slide toward oblivion.


Picture


Alas! Thirteen down, one to go.


I bet O. Henry could have written a nice short story about this place.


I guess I hadn’t thought about it in some time, but on my recent ride by I happened to notice that there was only one letter remaining—just the first “A” in “SALADA.” For some reason—maybe because I’d just turned 60—that realization filled me with melancholy. While pedaling up the long hill beyond the store, I found myself thinking of the letters falling, unnoticed, one by one, and reflecting on the brevity of human life. I wondered when the last letter would fall, and where I would be when it did. (For more on this theme, go to http://www.online-literature.com/o_henry/1303/ and read the classic O. Henry short story The Last Leaf.)

But as I neared the top of the hill, another part of my brain—which had evidently been clattering away unnoticed for the past mile or so—clicked into gear and delivered a completed palindrome I hadn’t even realized I’d been working on:

 “Salada ad? Alas!”

0 Comments

Derailleur Hangers Demystified

4/2/2014

27 Comments

 
As long as there are no seriously rusted or seized components to deal with, the “front end” of a triple-crank conversion is pretty straightforward: Remove the crankarms, unscrew the bottom bracket lockring and adjustable cup, slide out the original spindle, and replace it with a longer one of the correct size. Grease the bearings, reassemble and adjust, bolt the triple cranks to the spindle, and you’re done. (The procedure is the same whether you’re installing a conventional triple crankset or a double crank that’s been converted to a triple with a triplizer ring and attached granny ring.)
Picture


The original Simplex rear derailleur on this mid-1970s Raleigh was later upgraded to a better-shifting Suntour  derailleur of about the same vintage. The changeover was simplified by Raleigh's penny-pinching--but ultimately helpful--decision to outfit the frame with a mounting claw instead of a brazed-on hanger.

But the “back end” of a triple conversion—which ordinarily involves replacing an existing mid- or short-cage derailleur with a long-cage model capable of handling the wider-range gearing of the triple—has some potentially confusing variables that I'll make a plucky effort to clarify here.

 
Integral Mounts vs. Mounting Claws

The good news is that if you’re working on a relatively recent bike and components—anything after the late 1980s, say—you can bolt pretty much any derailleur onto any frame, because the interface between them has been almost entirely standard since then.

But of course, most readers of this blog will be retro-grouch types who are likely to be dealing with older equipment. In the 1960s, 70s, and on into the early 80s, the standardization we see today hadn’t yet taken hold, and there were at least three competing systems for mounting rear derailleurs. Each was promoted by a component manufacturer who hoped to lock in future derailleur sales by selling frame makers and the bicycle-buying public on the virtues, if any, of its own proprietary approach.

All three mounting systems were available in two variants: In an integral mount—sometimes called a braze-on mount—the tab that supports the derailleur is a permanent part of the bike’s frame. In bikes that use a mounting claw, the derailleur itself is bolted to one end of a shaped metal plate—the mounting claw—that is itself bolted to the frame at the other end.
Picture
Above, an integral--but not original--derailleur hanger on a Gitane Tour de France. The stock Simplex derailleur was originally fastened to the plain dropout with a mounting claw. The brazed-on Campagnolo hanger seen here was later added by a frame shop before a since-regretted repaint.

Below, the previously pictured Raleigh with the derailleur removed to better show the claw. The bolt to the left of the axle slot is threaded into a specially shaped nut that engages the rear half of the slot.

Picture
In the 1950s and 60s, the mounting-claw system was widely used on bikes of all quality levels. But as time passed, bike manufacturers moved toward integral mounts, beginning with their higher-priced models, and by the mid-to-late 70s, the use of mounting claws was pretty much limited to entry-level and department-store bikes. That may be why so many people look down their noses at them today.

But despite their undeservedly lowbrow image, claw mounts have some real advantages. Since they’re not part of the frame itself, a claw that gets twisted out of shape when the derailleur gets tangled up in the spokes can easily be replaced at low cost (don’t ask me how I know this). The same sort of mishap on a bike with an integral hanger would require having a frame builder cut off the damaged piece, braze on a new one, and repaint or rechrome the affected area.

As an added plus, the hardware that fastens the mounting claw to the to the dropout is generic, so a claw made for one company’s derailleur can typically be exchanged for a mount of another style without a lot of head-scratching.

Picture
Above left, a Campagnolo-type mounting claw, turned over to show the special-purpose nut that engages the axle slot. To its right, a Huret mounting claw (The nut and bolt are interchangeable and work for either style claw).
Campagnolo-Type Mounts
Developed by Campagnolo for its own product line, this type of mount is easily recognized by its 10 mm threaded center hole and a characteristic notch at the seven-o’clock position, which engages the derailleur’s B-limit screw for fine-tuning of its rotational position. Integral Campagnolo hangers were used on a great many Italian bikes, as well as those high-end French ones—like the Gitane Super Corsa—that were originally equipped with Campagnolo derailleurs.

This system has since become the de facto world standard. If your old ride is set up this way, it will (with a few exceptions) accept any non-French derailleur manufactured from 1960 or so to the present. Everyone should be so lucky.

Simplex Mounts
Campagnolo’s chief competitor was Simplex, a French company that went its own way with product design. Simplex mounts are recognized by their more rounded shape and the absence of threading in the mounting hole, since their mounting bolts—unlike Campagnolo’s, which screwed directly into the claw or hanger—passed all the way through the mount and were secured on the inside with a nut. (Some Simplex derailleurs were fastened with a shoulder bolt that was inserted from the back of the dropout and threaded into the derailleur).

There are a couple of other oddities to the Simplex mounting system. Although a Campagnolo-type derailleur can't be mounted directly on an unmodified Simplex mount (more about this in a moment), a non-claw-type Simplex derailleur can be bolted directly onto a Campagnolo mount. This can seem slightly strange, since it involves passing a 9-mm bolt through a 10-mm threaded hole. In practice it works okay, although few people seem interested in this particular component combination these days.

The second oddity is that although Simplex mounting claws are bolted to the dropout with the same generic hardware used for Campagnolo claws, the claws themselves are somewhat model-specific. In other words, there's no universal Simplex claw that will accept any Simplex derailleur. You need to have the correct claw (and the correct derailleur-to-claw mounting bolt) for the particular derailleur you plan to use.

To make matters worse, there seems to be no product marking or numbering system that makes it possible to tell which hanger goes with which derailleur. And some people claim that French bikes are difficult to work on! 


In any event, new derailleurs designed for the Simplex mount haven’t been made for decades. Used examples are fairly easy to come by, but pose problems of their own: Simplex derailleurs were typically made almost entirely from Delrin plastic, which was reasonably tough when new, but now, forty years later, tends to break with discouraging ease.

Worse yet--at least from the standpoint of the recreational cyclist, 
Simplex catered mostly to racers or would-be racers, so most of the derailleurs it did make were short-cage models. In the late 70s and into the 80s—near the end of its corporate life—the company did make a few long-cage models. These turn up on ebay from time to time, but they’re scarce and tend to command high prices.

Picture
Above: A Simplex dropout with the original, unmolested integral derailleur hanger. Note the unthreaded bolt hole and  the absence of any stops or notches, in contrast to the Campagnolo and Huret mounts pictured earlier.

Below: A Simplex hanger--originally similar to the one above--that's been "butchered" to accept a Campagnolo derailleur. The mounting hole has been threaded and a notch has been cut with a file to act as a derailleur stop. (The chainring bolt in the dropout slot has no bearing on the derailleur mount--it's there to serve as a stop for positioning the rear wheel.) Photo courtesy of H. Vanneck.


Picture
So what do you do if you have an original 1960s or 70s frame—maybe a nice Peugeot PX-10—that you want to retrofit with a long-cage derailleur for use with a triple crank? You have at least five options, including a couple of good ones.

The Brutalist Approach: Cut off the Simplex hanger with a hacksaw, then use a file to clean up the cut area, shaping it to match the non-drive side of the rear dropout. Paint or grease the cut and filed surface to prevent rust, bolt on a Campagnolo mounting claw and the long-cage derailleur of your choice, and you’re in business. If done carefully, the result can be hard to tell from a dropout that was manufactured without an integral hanger to begin with. Done crudely, it looks like hell.

Pros: Cheap and effective.

Cons: Widely regarded as a crime against humanity. It may also reduce the bike’s resale value, if that matters to you.


The Modified Brutalist Approach: Bring bike to a good frame shop and have the Simplex hanger cut off and a standard hanger brazed on in its place.

Pros: Difficult to tell from original if done by a skilled professional.

Cons: Costly, since the frame will have to be at least partially re-chromed or repainted where finish is damaged by brazing heat.

The Hybrid Approach: An integral Simplex hanger can be modified to accept Campagnolo-style derailleurs by running a 10 mm tap through the unthreaded bolt hole and filing (or grinding, but be careful) a stop in the body of the hanger, using an existing Campagnolo hanger as a pattern. Again, paint or grease disturbed original paint or chrome to prevent rust.

Pros: Invisible when derailleur is installed. Modified hanger will accept Simplex as well as Campagnolo-type derailleurs.

Cons: May reduce frame’s collector value. Scorned by Francophiles.


The Purist Approach:  Track down a functioning long-cage Simplex derailleur (be aware that this may cost beaucoup d'argent), and install it on the unmodified hanger. (Several vintage non-Simplex derailleurs are also said to be compatible with Simplex hangers that have had a 10-mm tap run through their original 9 mm bolt holes. This will at least spare you the stigma of grinding a stop into the hanger as well. Among these are the Shimano Crane, the Schwinn Le Tour—which was also manufactured by Shimano—and the first-generation Campagnolo Rally. There may be others as well. I have no first-hand experience with any of these, so don’t ask me.)

Pros: No criticism of the purist approach is possible.

Cons: Expensive; limited derailleur options.


The Hermaphrodite Approach: Leave the integral Simplex mount alone, and mount a standard derailleur claw on the dropout in the usual manner/

This sometimes takes a little fiddling. Some claws have a sort of S-shape when viewed edge-on, allowing the derailleur to sit a little closer to the freewheel than it otherwise would. But this can cause interference between the claw and the integral hanger.  A flat mounting claw will usually avoid this problem, but if the derailleur mounting bolt is long enough to protrude through the back of the claw, it may bear against the integral mount beneath and make it impossible to tighten the bolt all the way. This can be addressed by switching to a derailleur with a shorter bolt, or grinding or filing the end of the bolt enough to eliminate any interference. Adding a washer between derailleur and claw may also work, although this will sometimes move the derailleur far enough outward that it will lack enough travel to shift onto the largest freewheel cogs.

Pros: Cheap and fast; leaves integral hanger intact for the benefit of generations as yet unborn.


Cons: Presence of both integral hanger and claw is not noticeable unless you look closely, but the knowledge that both are there may lead to persistent low-grade angst on the part of some riders.
Below, a Campagnolo mounting claw attached to a frame already outfitted with an integral Simplex hanger. The resulting assembly looks a little strange before the derailleur has been installed, but it's scarcely noticeable afterwards. Note that the length of the derailleur mounting bolt can't exceed the thickness of the claw, or it will press against the integral hanger behind the mounting hole and prevent it from tightening all the way.
Picture
Huret Mounts
Huret, another bygone French component manufacturer, also had its own proprietary derailleur mount. As you can see in the photos above, it's superficially closer in appearance to the Campagnolo hanger than the Simplex version. The threaded mounting hole accepts a standard 10 mm bolt, but the notch that serves as a stop is located at about four o’clock, rather than seven o'clock.

A Campagnolo-type derailleur will thread right on to a Huret mount, but will likely sit at a crazy angle relative to the chainstay. The derailleur may even function in this position, more or less, but shifting performance is likely to be lousy.

A Huret hanger can’t be modified to accept standard derailleur by filing or grinding it, as a Simplex hanger can. That leaves you with the choice of cutting it off and using a claw (the Brutalist option), having a frame builder braze on a new one (the Modified Brutalist option), or using the Hermaphrodite approach of keeping the original brazed-on mount while adding a mounting claw.

The Purist approach—finding a Huret-compatible derailleur—can also work, but be aware that just because a derailleur was manufactured by Huret doesn’t necessarily mean that it was designed for the Huret mounting system. The company also made derailleurs for the Campagnolo-style mount. Some models were convertible from one to the other by using special tabbed washers, which came in two different versions. Good luck.
27 Comments

    Author

    I'm a chainring czar and editor in Cabot, Vermont. You know, where the cheese comes from.

    Archives

    January 2021
    December 2020
    March 2020
    April 2019
    February 2018
    September 2017
    August 2017
    October 2016
    March 2016
    March 2015
    November 2014
    July 2014
    May 2014
    April 2014
    December 2013

    Categories

    All

    RSS Feed