Red Clover Components
  • Home
  • About Triplizers
  • Store
    • 144 BCD Triplizer
    • 122 BCD Triplizer
    • 122 BCD Conventional Chainring
    • Triplizer Bolt Kit
    • The Freewheel Key
  • Installation Notes
  • Gallery
  • Blog
  • Useful Links
  • Contact Us

Stress-Free Cartridge Bottom Bracket Installation and Removal

1/24/2021

3 Comments

 
Picture
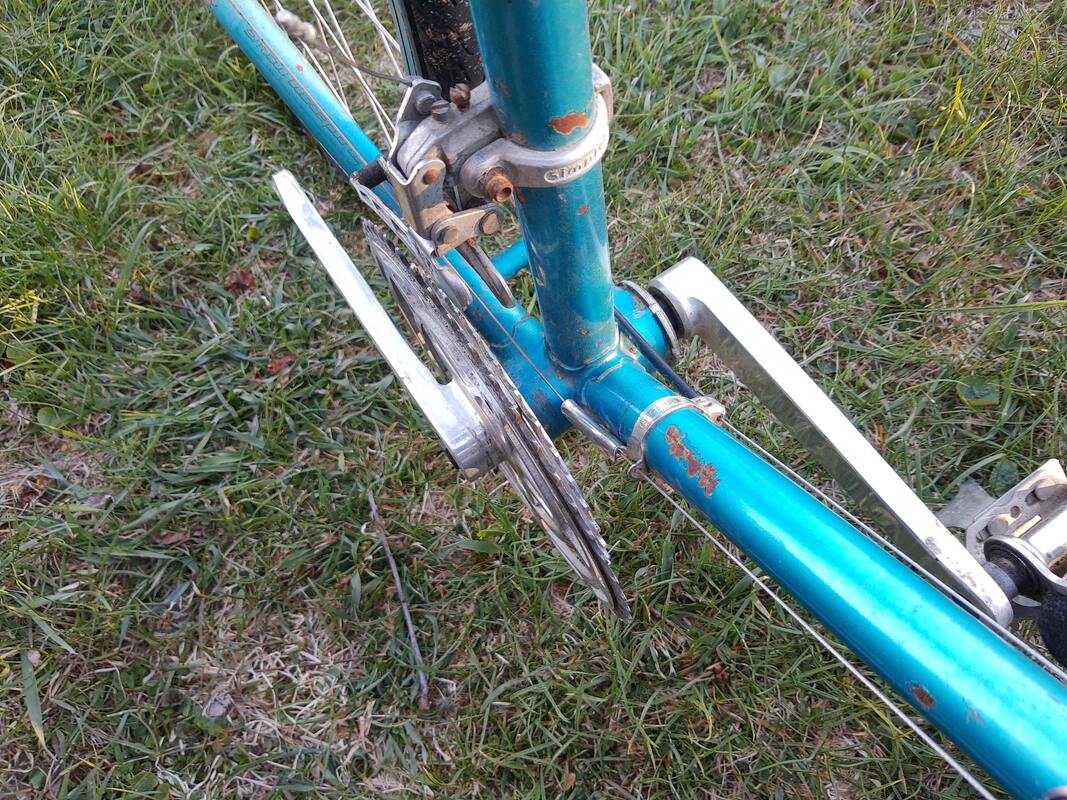
I'm pretty sure that's the original Stronglight bottom bracket on this old Gitane Tour de France--you can see the lockring on the non-drive side. Not sure what happened to the drive-side pedal, though.
As an old-bike enthusiast,  have always liked traditional cup-and-cone bottom brackets. If they're properly adjusted and cleaned and re-greased periodically, they can last for hundreds of thousands of miles. They're generally easy to work on. If you switch cranksets and need to adjust your chainline, it's a simple matter to do so by installing a longer or shorter spindle, while keeping the original cups and lockring.

Simple, that is, if you can find the right spindle for your particular bottom bracket. To some extent, it's possible to mix and match parts between manufacturers, but there are a lot of variables to reckon with, including shell width, spindle taper, and cup thickness. In short, the whole thing can be quite a can of worms

I'm not going to get into all that stuff here. The "Installation Notes" tab on this site provides some more detailed information, although I'm the first to admit that it's far from a complete reference on the subject.

But if your goal is to make an old bike into a reliable everyday rider--as opposed to "correct" restoration with all original-spec components--there's nothing wrong with replacing an original cup-and-cone setup with a modern square-taper cartridge bottom bracket. Trust me: no one will think the less of you for it. And if they do, the hell with them. Just hang onto the original BB (assuming it's not worn out) in case you or someone else wants to reuse it later.

So no more about cup-and-cone stuff. From here on, we're only going to concern ourselves with the best way to install  modern cartridge bottom brackets--and better yet, to remove crusty old ones that would prefer to stay where they are.

Picture
Oops--I should have turned the adjustable wrench the other way, so the writing wouldn't be upside-down. My bad!
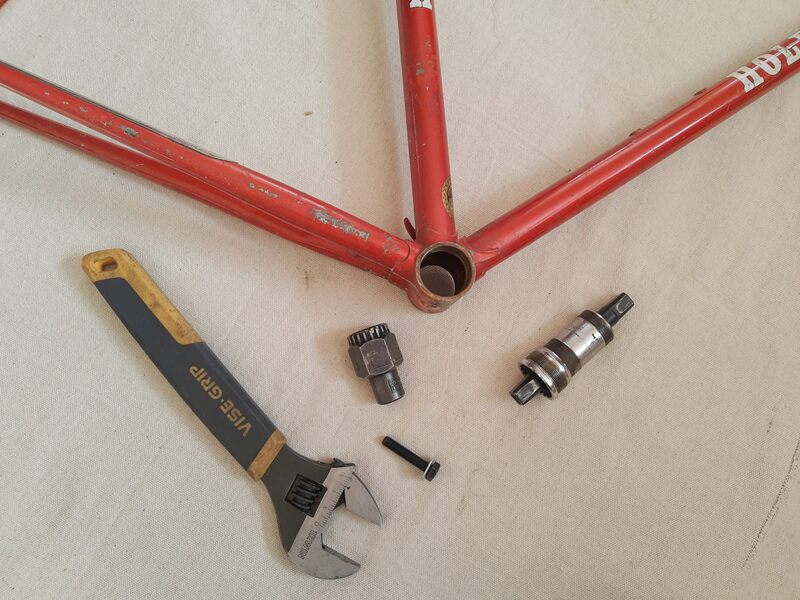
The photo above shows everything you need to install a cartridge bottom bracket: the bottom bracket itself, a frame to receive it (in this case a damaged old Holdsworth frame that has been hanging on the wall of my shop for years because I can't stand to put it in the steel recycling), a bottom bracket tool, and a big wrench. Ignore the bolt and washer for now--we'll get to that later.

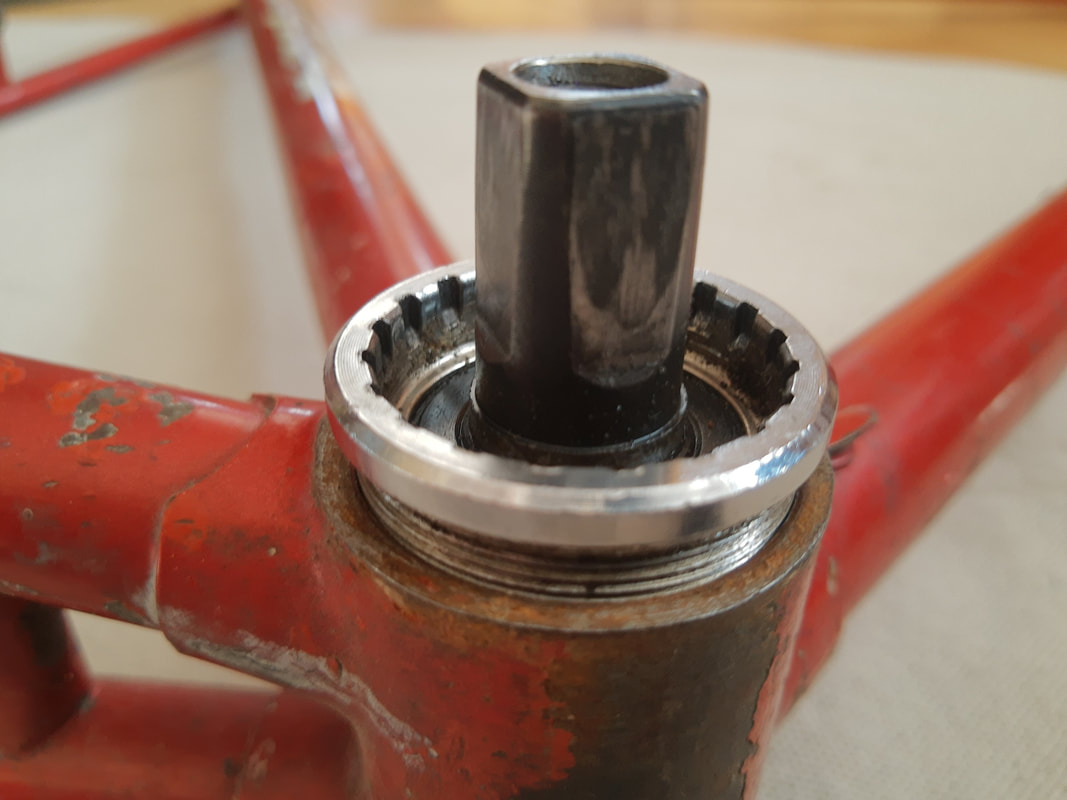
In principle, cartridge installation is perfectly straightforward. You grease the threads in the frame and on the drive-side end of the cartridge (you could use anti-seize compound instead of grease, although I never have), and thread it into the bottom bracket shell. English-threaded cartridges thread in counterclockwise, French or Italian-threaded go clockwise. Assuming that the threads in the bottom bracket shell are clean and in good shape, you should be able to thread it most of the way in by hand, at which point it will look something like the photo below.
Picture
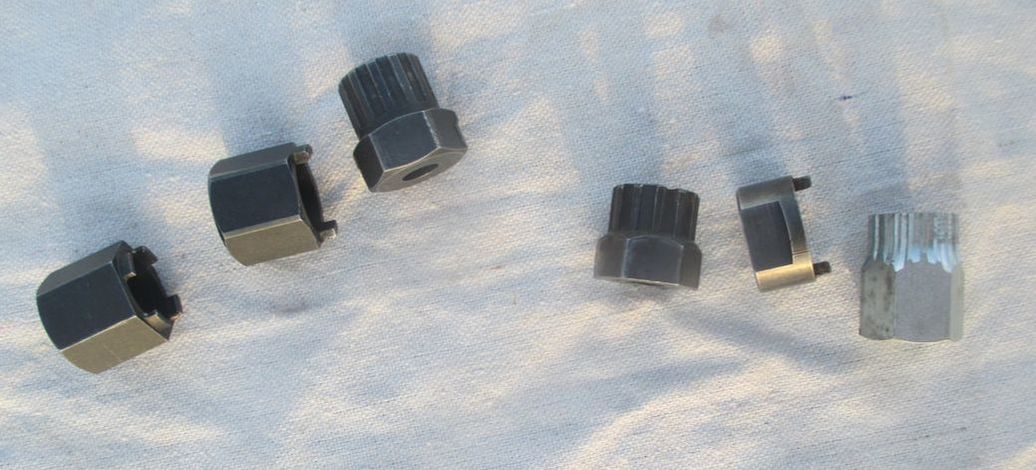
Now take in hand whatever version you have of the ubiquitous 20-splined Shimano bottom bracket tool, fit it into the splined end of the cartridge, and tighten away. Most bottom-bracket wrenches (including the Park BB2 shown here) have a square-drive fitting at one to accept a ratchet handle or a torque wrench. The latter makes it easy to determine when  when you've reached the proper torque of about 60 Newton meters (Nm), or 500 inch-pounds--take your pick. (If you don't have a torque wrench, either figure translates to "about as tight as you can get it.")

It sounds simple, and it usually is. But trouble is never far away as you approach maximum tightness. The design of the Shimano splines is such that the tool engages the cartridge something like the way a phillips screwdrive engages a screw: You have to exert a lot of downward force (which in the case of a bike frame mounted in a stand amounts to sideways force) as you turn it, or it will cam out of position. If that happens when the tool is under load, it can strip the splines, leaving ugly marks on the cartridge and possibly costing you some knuckle skin.

In general, I try not to find fault with engineers. They have their job, and I have mine. But I admit that I have never been able to figure out Shimano's reasoning here. Why not design a tool-to-cartridge interface that makes a positive, non-pressure-dependent fit? Something more like a star-drive screw, or the older Roberson screw? It can obviously be done, because Phil Wood bottom brackets use a different spline system that does just that. I'd use their stuff all the time if I could afford to.

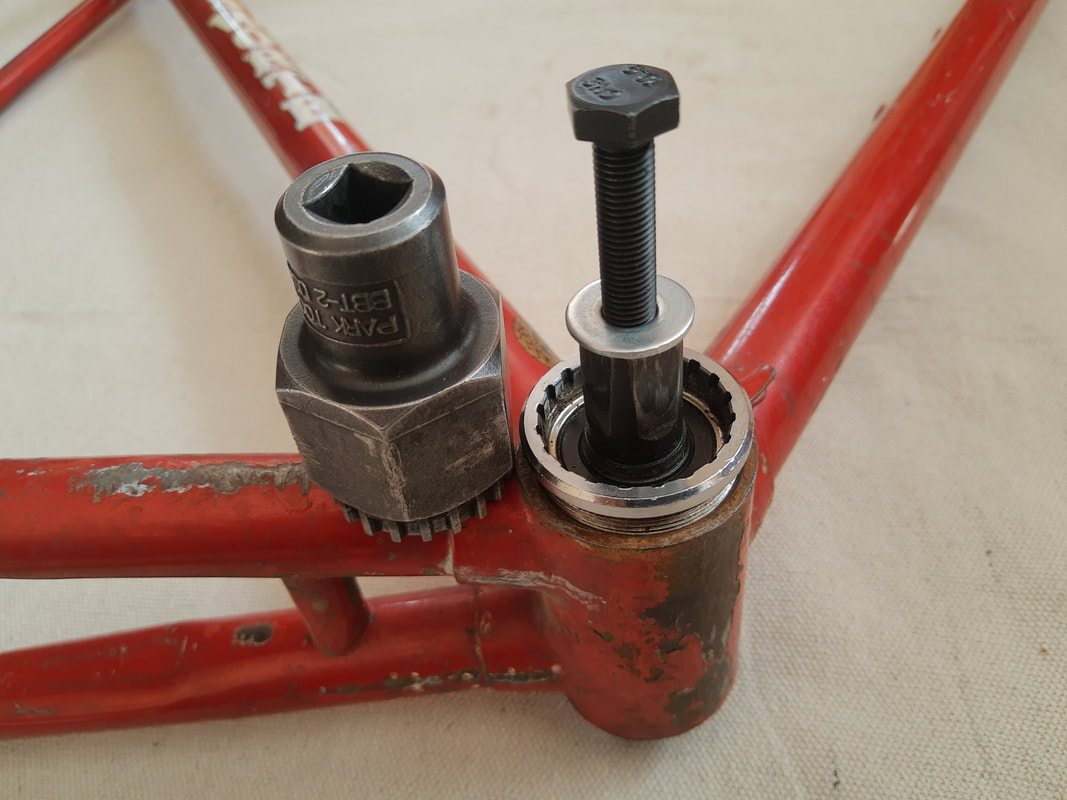
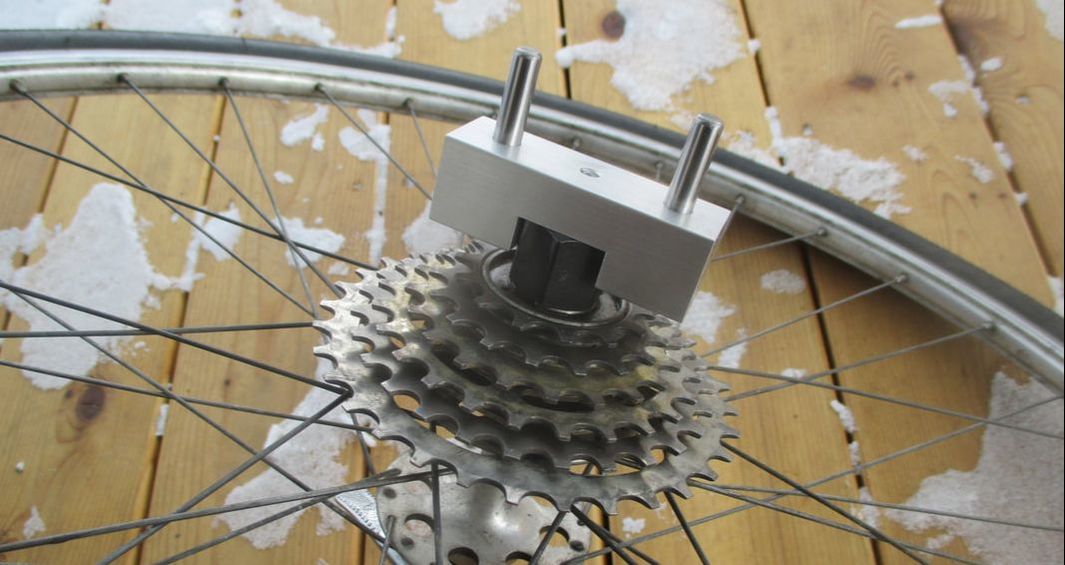
Fortunately, there's and cheap, fast, and simple way to work around the limitations of the Shimano design. Have a look a the photo below. See the bolt and washer threaded into the spindle? It has the same M8x1.0mm threading as a standard crankarm-fixing bolt, but it's longer--35mm as compared to a standard 15mm crankarm bolt.

What do you suppose will happen if we remove the bolt, fit the tool onto the splined cartridge, insert the bolt through the square-drive hole, and thread it back into the spindle?
Picture
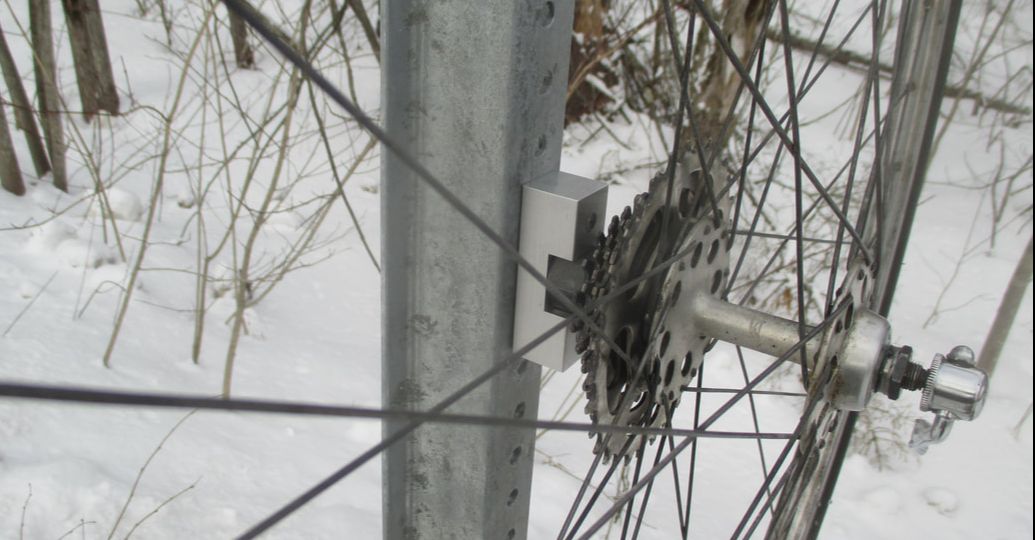
I don't know! Why don't we try it and see what happens? (Actually, I already know what's going to happen--that question is a journalistic tool called a "rhetorical device.")
Picture
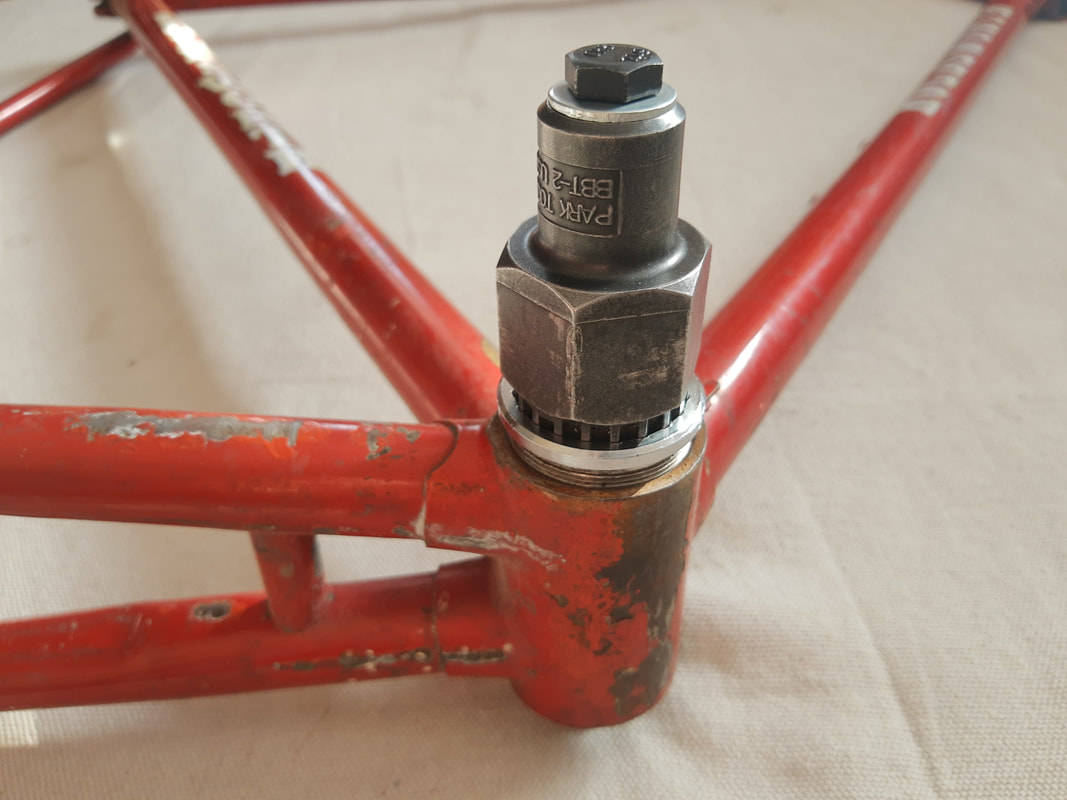
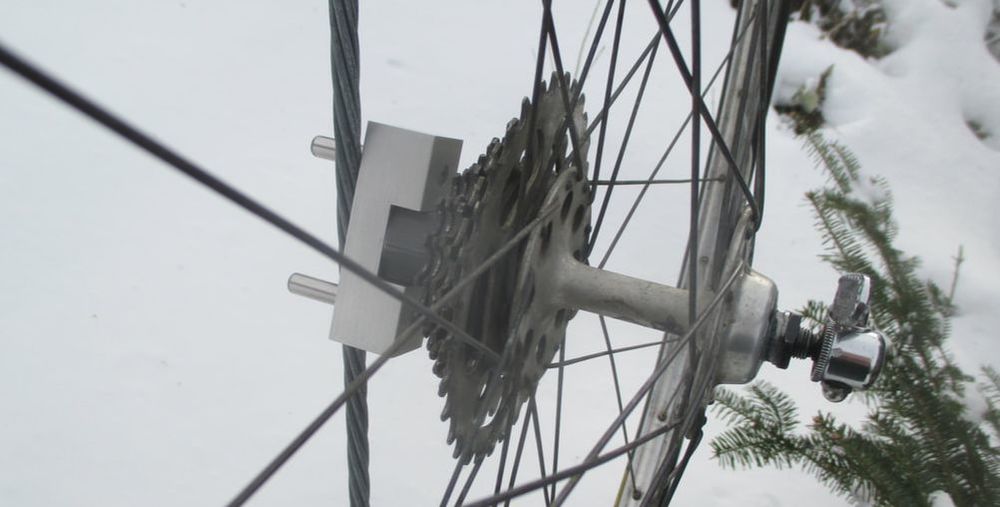
Criminey! Look at that!  Get out the big adjustable wrench, fit it onto the hexagonal body of the tool, and
reef that sucker down as tightly as you want--there's no way the tool can slip, now. Some BB tools, unfortunately, lack wrench flats, and in that case you're out of luck unless you want to take a pipe wrench to it. But c'mon, that would be barbaric. Just get a tool with a hexagonal body.

The required bolt will vary in length depending on the specific tool you're using, and perhaps the length of the BB spindle. The 35mm bolt shown here works nicely with my old Park BBT-2, but the current production version, the BBT-22 might require a slightly longer or shorter one--never having tried it, I can't say.

Fortunately, the length is non-critical, provided that the bolt isn't too short to thread four or five turns into the spindle. If it bottoms out before the head comes into contact with the top of the tool, just use a stack of washers to take up the extra space.

The same trick can also be used to fasten the non-drive-side cup, but since that side doesn't need to be as tight (that's why lots of non-drive-side cups are made of plastic, after all), I usually don't bother.

Either way, bear in mind that the temporary spindle bolt itself only needs to be finger tight. If you crank it down with a wrench, you're going to destroy the seals or bearing races in your nice new cartridge. So don't.

Finally, for the record, I want to publicly state that I invented this useful trick. That is, I didn't hear about it from anyone else, but thought of it on my own. Sadly, once I began sharing it around, it wasn't long before I ran into others who already knew about it.

Okay, so I'm not the inventor, I'm an inventor. That's good enough for me. Whoever gets the credit, it's a shop tactic that deserves to be better known.
3 Comments

Chainrings, Opera, and Truth

12/20/2020

1 Comment

 
When I got ready to sell my first batch of triplizer chainrings--originally I only made them in the 122 BCD Stronglight pattern--I gave some sustained thought to what I should call the business, such as it then was.
Picture
I almost went with Verismo Components.  I have long been something of an opera fan--though far from an opera nerd, still less an opera dweeb--and verismo was a late 19th-century Italian movement in to steer opera away from the doings of kings and the nobility and more toward the lives of the common people. My Italian is extremely limited, but I do know that "verismo" is derived from "verita," meaning "truth."

That's for me, I figured--I'm a truthful man of the common people. Problem solved.

The fellow pictured above, incidentally, is Pietro Mascagni, whose 1890 opera Cavalleria rusticana was a huge sensation when it first appeared, and is still regarded as a great classic of the verismo style. It's still performed today, usually on a double bill with Ruggiero Leoncavallo's Pagliacci, which debuted two years later. (Both are short operas, and stringing them together brings them up to a more typical operatic length, and gives the audience the feeling that it's getting its money's worth.)

Here's Luciano Pavarotti singing the Pagliacci's best-known aria, "Vesti La Giubba ("Put on the Costume."). Even if you're not familiar with opera at all, you may recognize it anyway--it's one of  those operatic numbers that's leaked over into the culture at large:

https://www.youtube.com/watch?v=Z0PMq4XGtZ4

That pairing is familiarly known as "Cav and Pag." That being so, it hardly seems fair to give Pietro Mascagni a photo without doing the same for Ruggerio Leoncavallo, so here he is:
Picture
Picture
He looks quite a lot like Giachomo Puccini, doesn't he? Actually, it's not that strong a resemblance physically--it's mostly the wonderful moustache that makes it seem so.

Well, heck, now having said that, I guess I also have to include a photo of Puccini. Okay, here he is, at stage left:

Eventually, though, I gave up on Verismo as a potential name, mostly because I thought it would be confusing to give an Italian name to a company whose only product was triplizer ring for French cranksets.

Instead, I came up with Red Clover Components, for two reasons. First, red clover is the Vermont state flower. I live in Vermont, and that's where the chainrings are made. Also, clover plants have three leaves, which struck me as nicely emblematic for a product called a triplizer.

I assumed that lots of people would want to know where the name came from, so I have had that explanation cued up and ready to go for the better part of a decade. But since no one has asked yet, I'm just putting the explanation out there unprompted.

For the sake of symmetry, I suppose, it would be best if I also had a third reason for the Red Clover Components name. No doubt I could come up with a plausible-sounding after-the-fact one if I tried, but that would be slightly dishonest of me. Verismo!

1 Comment

If You Want to Make God Laugh, Tell Him Your Plans, or How to Get a Free Bolt Kit

3/29/2020

1 Comment

 
I was really looking forward to going to Eroica California for the first time this spring. I was going to be there as a vendor, not a rider, but I had still figured out a way to get some riding in: the plan was to fly from Boston to San Francisco on March 26 with my friend Dave, then visit with another friend in Santa Rosa for a couple of days before embarking on a little camping tour down the coast to Cambria. We figured on arriving by mid-day on Thursday, in plenty of time to set up the booth.

Everything was ready to go. I modified the cabling of my PX-10 so I could disassemble it (in a sort of bastard rinko fashion) for easy transport. I put together some snappy-looking chainring displays. I picked up a new batch of 144 triplizers from the polishing shop. I bought a new pair of pants.

But then...well, you already know the rest. You had plans, too, right?

My special Eroica deal was going to be the inclusion of a free bolt kit with any triplizer purchase--something that ordinarily costs an additional $12. Anyone buying a 37-tooth Stronglight ring (which doesn't require the triplizer bolt kit) would get it for $12 off the usual price.

In theory, the event is going to be rescheduled for sometime in September or October, although it would not surprise me if it doesn't happen at all this year. But here's the point: order a chainring between now and July 4, 2020 (a date I just now pulled out of thin air), and you get the same deal--a free bolt kit with a triplizer, or twelve bucks off on a 37-tooth double ring. And, what the hell, the same $12 off on the Freewheel Key.

Stay safe, everybody!


1 Comment

Two Touring Bags

4/6/2019

1 Comment

 
I recently got back to Vermont from a three-week bike tour of Georgia, Alabama, Mississippi, and a little bit of Tennessee. It was a great time. I was accompanied by four friends on the first leg, from Savannah to Montgomery, Alabama. I was on my own across the rest of Alabama to Meridian, Mississippi, then west and north through the Mississippi Delta and up to Memphis.

I may tell that story some other time, but for now I wanted to describe a couple of new methods I used for carrying stuff, on the odd chance that other bike tourists might also find them useful.
Picture
The Feed Bag and what's left of my woodpile. Note that the strap goes under the bag, not over it. I didn't wear those wool pants on the tour down South, but there's still quite a lot of April snow here in Vermont.
The Feed Bag
On past tours, I've carried snack foods--the essential fuel that keeps a bike tour going--in my shirt pockets or pants pockets or saddlebag or some combination of all three. I could never remember exactly where they were or how much food I had left, and once or twice I ran out of food altogether. That's no laughing matter when it happens far from the nearest convenience store.

This time, I tried a different approach. The basis of the Feed Bag is a tough cotton bag, measuring about 7 x 12", with a hem at the top for a drawstring. I bought a dozen of these a year or so ago--they're some kind of Italian military surplus equipment bag--but anyone with a sewing machine and some suitable material could whip one up in a few minutes.

Next, I found a piece of nylon webbing with a quick-release plastic buckle and stitched it to a flat side of the bag, a couple of inches below the top, so I could fasten it around my waist with the strap against my body and the mouth of the bag flopped down over it, as pictured below. I also removed the original fabric-tape drawstring and replaced it with a piece of ⅛” shock cord. I tied a knot in the cord so the mouth of the bag was mostly closed, but still open by an inch or so.

Every day or so, I’d load up the bag with my usual touring fuel--cellophane sleeves of peanuts, packages of peanut-butter crackers, and Snickers bars. I usually had a package or two of Grandmother’s Cookies, too. You can find them in every roadside convenience store in America. They’re not all that outstanding as cookies, but they get the job done: a package of two contains almost 400 calories, according to the label.

With the bag buckled in place around my waist, positioned a little behind my hip pocket, it was easy to reach back with my right hand, push my thumb, index finger, and middle finger into small opening, and spread it open enough to insert my whole hand. More often than not I would stop briefly to unwrap whatever I pulled out, but it still made refueling on the go a lot more convenient. And just touching the bag tells you how much food you have left.

Of course, if you tour in a bike jersey with the usual back pockets, this may be redundant. But I prefer to wear regular-looking clothes on bike tours, the better to blend into to the everyday world. And if you put on a jacket or wind shell over your jersey, you don't have to go rooting around under it to find a candy bar.


The Cake-and-Beer Bag
On every bike tour, there comes a time when you want to transport a rotisserie chicken, six-pack of beer, or grocery-store-freezer-case cake to your next campsite but don’t want to destroy it by cramming it into a pannier (assuming it will even fit, which it probably won’t.) Here’s where you deploy the Cake-and-Beer Bag.
The Feedbag is a simple piece of gear, but the Cake-and-Beer bag is simpler still. It doesn’t even include the bag. It’s just a method of rigging a plastic grocery bag so you can sling it on your back in such a way that it won’t promptly swing around to front and drive you nuts by getting tangled up with the handlebars.
Picture
Here's a mock-up of the Cake and Beer Bag. Because I didn't have a rotisserie chicken handy, I filled it with a couple of boxes of crackers and a bag of pasta for the photo.
Take a three-foot piece of nylon strap and tie an overhand loop at each end. Take a piece of light nylon cord of about the same length as the strap and tie it between the two loops at the ends of the straps. Take a separate piece of light cord, maybe a foot and a half long, tie the ends together to form a loop, and run the loop through a short piece of smooth stick with a hole bored in the middle. (Because I’m fiddly by nature, I whittled a nice smooth toggle from a scrap of cedar board, but a two-inch length of stick would work just as well.) Coil them up together--they take up almost no space and weigh almost nothing--and stash them where they’ll be easy to lay your hands on when you need them.

Picture
A closer view showing the toggle and the pebble in the corner of the bag. Safety-conscious rider that I am, I made sure to use highly visible string.
When that time comes, put a marble-sized pebble in one corner of the plastic grocery bag containing your food, and hitch the string with the toggle around it. (No doubt there’s a name for this rudimentary hitch--it’s too simple to be called a knot--but I don’t know what it is. Have a look at the photo of the marker and parachute cord in the photo below if you’re not sure what I mean.) The pebble keeps the loop of cord from slipping off the corner. If you can’t find a pebble, you could tie a knot in the corner of the bag instead, but the pebble is easier.
Picture
What's this hitch called? [EDIT: Okay, I looked it up--it's called a girth hitch.]

Tie another knot in the top of the bag to keep your stuff from falling out, and use the same hitch to secure the string that's connected to the strap around the mouth of the bag.

Put your head and one arm through the strap and adjust the bag so it hangs near the small of your back. Take the piece of stick (or fancy-pants handmade toggle) and push it through one of the belt loops on the opposite side of your pants. That prevents the bag from rotating around to the front. (Wait, what? You’re bike touring in stretchy bike shorts with no belt loops? Gosh, maybe you could sew a small loop onto the waistband. I’m no help here--I always wear lightweight zip-leg pants with liner shorts under them.) It may take a few tries to get the length of the strings just right, but do that at home. Once you have the rig set up, it never needs to be adjusted again.

That’s it! It’s even a pretty comfortable carry, assuming you can arrange things so no sharp corners are digging into your back. Transporting a frozen cake this way feels really good on a hot afternoon.


1 Comment

New Product! Introducing the Freewheel Key

2/1/2018

12 Comments

 
Picture
It's the size of a Swiss Army knife, but different in concept: It does one thing very well.
I recently finished final testing of a new tool that I hope will find a place with riders who tour on freewheel-equipped bikes. I can’t be the only one who still does that, can I?

I’m calling it the Freewheel Key. It’s a lightweight, portable tool that makes it easy to remove a freewheel from a hub when you don’t have access to the heavy shop tools ordinarily used for that job. (Bike tourists of a certain age may recognize a family resemblance to a long-extinct tool called the Pocket Pro, although this successor version is stronger, much more versatile, and easier to use.)

Who needs to remove a freewheel by the side of the road?

Mostly, people who have to replace a broken drive-side rear spoke. Given the dished configuration of rear wheels on derailleur-geared bicycles, the spokes on that side are under higher tension--and much more prone to breakage--than those elsewhere. I’ve been scheming about this tool since last spring, when I broke two spokes in the course of  a cross-country tour.

At this point I’m going to briefly turn down a side road and say a few words about the difference between cassettes and freewheels, since they’re similar in appearance and often confused with one another.

Cassettes are what you’ll find on most modern bikes. The rear cogs slide onto a splined extension of the hub and are secured by a threaded lockring that’s secured with a fairly modest degree of torque.

(If you want to dig into this a little deeper than I’m going to here, Sheldon Brown has a good tutorial on the subject here:)

Unlike cassettes, freewheels thread directly onto to the hub in such a way that they’re tightened by the force of pedaling. They were standard on derailleur-equipped bikes until the mid-80s or so, when they were largely replaced by cassette hubs. Nowadays, freewheels are standard equipment only on new department-store-quality bikes. But quality replacement freewheels are still available, and there are still millions of fine old freewheel-equipped bikes out on the road.

Removing a freewheel starts by inserting the correct freewheel remover into the splined or slotted body of the freewheel, and securing it with the quick-release spindle and nut.


Picture
The group of three freewheel removers on the left have 1" hexagonal bodies that are compatible with the fixed jaws of the Freewheel Key. From left to right: a four-prong Suntour tool, an earlier two-prong Suntour, and a splined Shimano remover that fits most freewheels in use today. Grouped at right, three non-compatible removers: a Shimano with a 15/16" base; and old Suntour two-prong with a 7/8" base, and an Atom/Regina remover, also with a 7/8" base. Park Tool, bless them, makes reasonably-priced 1" removers to fit most common freewheels, both old and new.
Picture
A Suntour two-prong remover temporarily secured to the freewheel body. I like to screw on the spindle nut until it's tight, then back it off a turn and a half so it won't bind when the freewheel starts to loosen.
In a well-equipped bike shop, that temporary assembly is then turned over so the hexagonal steel remover can be clamped in a solidly mounted bench vise. At that point, the wheel is turned counterclockwise, with the wheel itself providing the mechanical advantage needed to back out the freewheel. In a shop that lacks a vise, the mechanic bears down on the remover with a wrench until the freewheel begins to unscrew from the hub.

Picture
When it comes to removing a freewheel in the shop, the big-vise method beats the big-wrench method every time.

Either way, that takes force, and often plenty of it. A freewheel that’s been hammered home for a few thousand miles by a strong rider with low gears--especially if the threads weren’t coated with anti-seize or grease when it was last installed--can be a stubborn thing indeed. If you’re using the wrench method, a 12-inch adjustable is about the smallest tool that will give you any chance of success. A 15-inch adjustable is even better.

More often than not, either one will have to be extended with a cheater bar of some sort. Before my shop had a bench vise, I used to keep a two-foot length of galvanized water pipe handy for use as a freewheel persuader.

Fortunately, once it starts to turn, even a very tight freewheel will usually keep turning easily. After the first rotation or so, it’s often possible to remove the spindle and turn the remover the rest of the way by hand. (If you leave the spindle in place, remember to loosen it incrementally as the freewheel backs out, or the spindle nut will bind against it, possibly stripping the nut or breaking the spindle itself.)

Okay, detour complete. Turning back onto the main road now.


So what happens if you snap a drive-side rear spoke or two on a remote stretch of road somewhere in West Texas? You’re not going to have a vise or a big wrench and cheater bar in your tool kit then.

But who needs them? Take off the rear wheel, insert the freewheel remover, position the Freewheel Key, and thread the spindle into it. Now engage its hardened steel dogs with some nearby element of roadside infrastructure--a steel signpost is ideal, but anything from a steel guardrail support to chain-link fence or storm-drain grate will work just as well--and rotate the wheel counterclockwise, exactly as in the bench-vise method.

The pictures below probably explain that better than words do.
Picture
Thread the spindle into the Freewheel Key to hold it and the freewheel remover in position. Some older French spindles use non-standard threading (vive la France!), but because the hub doesn't care how the spindle is threaded, they can be replaced--if only for the duration of that cross-country tour--with any M5x0.8 threaded spindle of the same length.
Picture
Plug the steel dogs that extend from the front of the Freewheel Key into the perforations on any square- or channel-section signpost, and turn the wheel counterclockwise while pressing it firmly against the post--a motion that will be familiar to anyone who has opened a child-resistant bottle. When you think about it, the setup corresponds closely to the vise-removal method pictured earlier--the aluminum body of the tool substitutes for the vise, the signpost for the workbench, and the cylindrical steel dogs for the big bolts that secure vise to bench.
Picture
The press-and-turn method also works with a utility-pole guy wire, or almost any other immobile steel object that's strong enough and fits between the dogs. This photo and the preceding one, incidentally, also show why no one goes bike touring in Vermont in February.
Thanks to its 7075 T6 aluminum body, the Freewheel Key weighs in at a fairly svelte 5.2 ounces, or about 150 grams. Even so, it's a tough little beast. I’ve broken two freewheel pullers and destroyed one wheel while trying to see what it will take to break the tool itself--and I still haven't managed to break one.

“Wait a minute,” I can hear someone say. “The alloy body may be almost as strong as steel, but even heat-treated 7075 aluminum is quite a bit softer than steel. What about damage to the aluminum where it bears against the steel freewheel remover?”

In fact, the aluminum does wear at that interface--although much too gradually to make any practical difference. In working with the prototypes, I’ve found that two dozen of cycles of as-tight-as-humanly-possible freewheel tightening and loosening leaves faint marks on the aluminum jaws, but it doesn’t come anywhere near damaging them in terms of function. (Engineers refer to this type of wear as “fretting,” which admittedly does sound worrisome.)

I suppose that a busy bike shop would wear one out pretty quickly by using it in place of a bench vise. But it's not made for regular shop use. Normal roadside use won’t faze it in the least. Even if you’re the worst spoke-breaker in the history of bicycle touring, one Freewheel Key should last you for several lifetimes.
Picture
This well-used prototype tool shows a few wear marks from the pressure of the steel freewheel remover. But look which one broke first.
I’ve resisted the urge to beautify the tool in any way. Starting with heavier bar stock and CNC machining it to a swoopy, graceful shape would have doubled or tripled the cost without adding anything to the performance of the finished product. There’s no polishing or anodizing. It’s an emergency tool--simple, effective, and as low in cost as I can make it.

I like this thing a lot. The prototype pictured above has taken up permanent quarters in my touring tool kit.

Not everyone, I realize, will see things the way I do. I can hear the contrarian view already:

"Be serious! One hundred and fifty grams?" [Is this the same hypothetical person who was asking about fretting a few paragraphs back? It could be, but I think it's someone else.] "That's half again as much as one of those big Snickers bars! You're going to haul that much weight around when you're not even sure you'll need to use it?" [shakes head in disbelief]

Too true! The hypothetical person is right. It does weight as much as one and a half Snickers "2 to Go" candy bars (the kind that theoretically serves two, but that bike tourists invariably eat all at once). And that doesn't include the freewheel puller itself, which adds at least another ounce.

In short, this is not a tool for riders who think about their touring loads in terms of grams. It's  a tool for people like me, who place a high value--perhaps an overly high value?--on mechanical self-sufficiency.


And here’s the really big question: How many mechanical-self-sufficiency-valuing bike tourists out there value mechanical self-sufficiency enough to actually buy one of these things? At a price that pays for making them here in Vermont?

I guess that’s two questions.

I’m going to take the direct approach to finding the answers.  A small production run is in the works, and the first Freewheel Keys are going to show up in the Store section of this website sometime in the next few weeks. You won’t be able to order one until then, but I'd be happy to answer any questions you might have  in the meantime.
12 Comments

Are Triplizers Immoral?

9/11/2017

0 Comments

 
 A year or so ago, I went on a vintage ride organized by Onion River Sports, the bike shop in nearby Montpelier, Vermont (and a very good shop at that). Eroica it was not. It was basically thirty or forty people with a variety of old bikes meeting up in the parking lot on a Saturday afternoon, going for a 25- or 30-mile ride, and meeting up afterwards for pasta, beer, and commemorative T-shirts. The ride itself was hilly--as rides around here tend to be--and mostly on dirt. It was great.
Picture
Don't you love this guy's pants?
During the milling-around phase just before the ride started, I wandered over to a guy with a beautiful Schwinn Paramount from 1970 or so. The red paint was immaculate, and it was still equipped with the murderous gearing typical of Paramounts from that time period: Something like 52-49 chainrings in front and a 14-24 5-speed freewheel.

I complimented him on the bike and remarked that I'd be walking a lot of hills if my bike was geared that way.

(In addition to just being friendly, of course, my plan was ease into a conversation that would end with him saying "How I wish there was some convenient way to convert this original crankset to a triple so I could ride effortlessly up even the steepest hills! If such a product existed I would buy it immediately!" I have few equals when it comes to guerilla marketing.)

Alas, it didn't work. He agreed that the gearing was much too high, and that he had to walk a lot of hills. Then he went even further. I don't remember the exact words he used, but the gist of it was that originality had to take precedence over mere comfort.

Before I could think of a response, we were rolling.
PictureWith a new Brooks saddle and a lighter wheelset, this Dayton-made "Van Cleve" model might make a nice commuter. But the Smithsonian Air and Space Museum prefers to leave it alone.


I've run into that attitude before, and I have to say that it always leaves me kind of puzzled. I mean, is the bike supposed to serve me, or am I supposed to serve the bike? Should my riding experience today be dictated by the Schwinn product manager who specced the chainrings when I was in tenth grade?

At this point I should point out that I have strong views on maintaining the originality of old bikes. I won't permanently alter old frames or components for the sake of short-term convenience. That position has cost me, too: I spent a shocking amount of money (for me, at least) on a long-cage Simplex derailleur for my Peugeot PX-10, when I could have gotten the same functional result by  by butchering the original hanger and installing a cheap and perfectly reliable Suntour VGT-Luxe. (For more on this, see preceding blog entry "Derailleur Hangers Demystified.")

But I see nothing wrong with swapping bolt-on components at will. Why not? The bike's next owner can always restore it to original condition by removing the non-original crankset or wheels and replacing them with the right ones.

In the exceptional case of a bike with real historic value--Eddy Merckx's hour-record bike, for example, or one of the five surviving bicycles built by the Wright Brothers--it's best leave things completely alone. But that anonymous bike-boom Raleigh International? I say go ahead and swap parts around--just be sure to keep the old ones.
Picture
A nice day for a fall ride. The guy on the left--with the old Bottechia--is Onion River Sports service manager Per Tonn. I don't know the other folks. I was about five miles behind them at this point.
I saw the Paramount guy a few more times in the course of the ride. On two of those occasions he was walking his bike on steep pitches. He seemed to be having a good time, although he was so far ahead of me that I couldn't say for sure.

In any case, I'm pretty slow to begin with, and was made even slower by a loose headset on my newly rebuilt Gitane Tour de France, which I had to stop and adjust. I'd been hoping to see the Paramount again, but by the time I got to the finish both bike and owner were gone.
0 Comments

Notes on a Cross-Country Tour

8/22/2017

5 Comments

 
It's been about four months since my friend Phil and I finished a cross-country tour on the Adventure Cycling Association's Southern Tier route, from San Diego, Calif. to St. Augustine, Fla. It was an excellent trip in pretty much every way, and a feet-first plunge into loaded touring, given that my only prior experience was a couple of one-overnighters.
Picture
Approaching Aguila, Arizona. It's often said that recumbents don't climb as well as upright bikes, but the rider is also a big factor. I spent most of the trip struggling to catch up to Phil on hills. If the recumbent really did slow him down, I'm glad he didn't have an upright. Dig those temporarily matching panniers!
We started on Feb. 21 and finished on April 14--a total of 53 days overall, of which six were non-riding rest days. Neither of us had any way of measuring mileage, but if the 3,050 mile figure listed by the ACA is accurate, we averaged about 63 miles per riding day. (Coincidentally, I turned 63 about three weeks after the end of the ride.) Our longest daily mileage--based on distances listed on the ACA maps--was somewhere in the low nineties; our shortest was about 35.

My point in mentioning this is not to draw attention to how awesome we are (although we are pretty awesome). What I really want to do, before I forget, is just record some of the useful day-to-day stuff we learned along the way about doing a long bike tour. Given my limited experience at such things--this was my first tour, after all--I don't offer any of this as advice. But here are some things that worked well for us.

Picture
Breakfast on the Nueces River. Living large with two kinds of peanut butter and chocolate granola.
1. Food
Just before noon on our first day, we stopped to buy lunch food in a San Diego supermarket, where Phil suggested buying a bag of flour tortillas.

It was such a good idea we did it again later. And again. And again. For the next seven weeks, in fact, we ate tortillas at least twice a day, and often three times a day. They're cheap, fairly dense in terms of calories, and easy to travel with. They don't break or crumble, and the flexible plastic-bag packaging allows them to slip easily into a even a pannier that is already packed full.

Best of all, they're versatile and really good. We ate them with peanut butter and bananas for breakfast, with cheese and avocado (or more peanut butter) for lunch. We sometimes ate shredded rotisserie chicken with mayonnaise and Cholula hot sauce rolled up in tortillas for supper. That is a good meal.

It was also fascinating to watch the tortilla supply change as we traveled. There were many brands available in California, but even more in Arizona and New Mexico. Some stores in those states had most of one aisle devoted to tortillas. The selection gradually declined as we headed east in Texas. By the time we reached Mississippi, there was often just one selection to be had--Mission brand, the Wonder Bread of the tortilla universe.

We carried a small folding isobutane stove and a one-quart aluminum pot, which allowed us to have hot tea in the morning and cook simple meals. One favorite was smoked sausage boiled with rice and sliced sweet potato. We always carried a couple packages of ramen noodles and foil pouches of tuna for times when nothing better was available.

By the way, you can make an excellent convenience-store gorp by crushing a medium-size bag of Ruffles potato chips until the fragments are cornflake-sized, then adding two miniature boxes of raisins and a small bag of mixed nuts.


Picture
Our last campsite, at Anastasia State Park in St. Augustine. Somewhere back around Warrenton, Texas, one of Phil's panniers--the one with all his clothes--fell off his bike. He went back and looked for it, but never found it. He rode the last 1,200 miles with a soft-sided Wal-Mart beer cooler, filled with replacement Wal-Mart clothing, zip-tied to his rear rack. It does have a certain charm.


2. Bikes, Gearing, and Luggage

Phil rode a long-wheelbase Rans recumbent, and he seemed very comfortable throughout. He was certainly faster than me. Not sure about the details of his gearing, but I did notice that he almost never used his granny chainring. Is that a recumbent thing? I'll have to ask him.

I rode a 1981 Miyata 1000. I'd thought about going with my triplized PX-10, but ultimately decided to give the Miyata--a legendary loaded touring bike of its day--a chance to do its stuff. It worked really well. I had it set up as a half-step-and-granny, with 48-44-30 chainrings (on the original 86 BCD Sugino crankset) and a 14-16-19-23-28-34 Suntour freewheel.

I never wished for a higher gear, but I would have liked to have a slightly lower one during a couple of long climbs. A 46-42-28 crankset might have been a slightly better choice. (As it happens, I have exactly that gearing on the triplized Model 93 on my Raleigh Gran Sport.)

Both of us tried to cut our luggage to a bare minimum, and it paid off. We didn't have anything we didn't need (except for our 6 pounds of tools and spare parts, most of which went unused), and never needed anything we didn't have.

My base load, including the tent fly, cooking gear, tools, clothing, and sleeping bag and air mattress, came to about 32 pounds. That includes my panniers and trunk bag, but not the bike-mounted racks. When we added food and a gallon of water apiece--as we sometimes did in West Texas, where it watering holes might be 50 miles apart--I must have been carrying 45 lbs or more.

Guesstimating by pannier volume, it seemed to me that many of the other riders we saw along the way had to be carrying carrying twice the weight that we were, the poor devils.

I was able to fit all my stuff in a pair of smallish 1980s vintage front panniers and a trunk bag on a rear rack. The steering felt "heavy," but the bike handled very well once I learned to equalize the side-to-side load between panniers. If the load wasn't balanced, the bike developed a bad speed wobble at about 15 mph. (I had heard that it's possible to dampen a speed wobble by pressing a knee against the frame's top tube, and was relieved to find that it does. I'm not sure how I would have managed the 4,000-foot descent into California's Central Valley otherwise).

Overall, I much preferred the setup I used to the feel of rear panniers alone.

Phil, on the other hand, just used a set of rear panniers and a small handlebar bag. At least he started with a set of panniers--he finished with one pannier and a soft-sided beer cooler. I hope someone in Texas found the one he lost and is putting it to good use.


Picture
In Greenville, Florida, boyhood home of the great Ray Charles. You can see from my expression that I'm wishing I had brought my tuxedo.
3. Clothes

I have always felt that non-cyclists are put off by riders who are decked out in spandex, colorful cycling jerseys, and wraparound sunglasses. That's not necessarily because they're being unfriendly. If you're dressed like a racer--or at least wearing what a non-rider thinks of as racer garb--the non-rider is likely to assume that you're in a big hurry, and probably don't have time to stop chew the fat.

Is that a wingnut idea? I have no data to support it, but makes sense to me

Anyway, both Phil and I made an effort to wear fairly normal-looking clothing. He mostly wore t-shirts and a pair of pants with zip-off legs (no need for cycling shorts on a recumbent). I wore a white cotton dress shirt, black long underwear, two pairs of liner shorts, and a pair of unpadded mountain-bike shorts. (The liners were thin and cheap, so I had to wear both pairs to get adequate padding. I washed the outer pair every night, put on the clean pair first the next morning, and moved the previous day's inner to the outside.) I convinced myself that the combination of black long underwear and black shorts looked something like regular long pants if you didn't look too closely.

And we did have lots of fun conversations with the locals at markets and convenience stores. That wonderful talk we had with the overall-wearing guy in Poplarville, Mississippi? Who rode across the country on an Indian motorcycle in 1960? Would that have happened if we'd been wearing cycling clothes?

Heck, I don't know, maybe it would have.


PictureA memorable desert campsite outside Lordsburg, New Mexico. Neither of of us had kickstands, but we found that our bikes would reliably hold one another upright if we leaned them together head-to-tail, like horses standing in a pasture.
4. Sleeping

According to my notes, we spent 4 nights with friends, 8 nights with Warm Showers hosts (www.warmshowers.org), 14 nights in motels, and 27 nights camping. Our motel stays most often happened because we were in an urban area at nightfall with no other options, but there were a few occasions when we were just tired and wanted to sleep in beds. Two of the motels nights were timed to avoid heavy rain and lightning.

In California, Arizona, and New Mexico, it was simple to get out of sight of the road and pitch our tent out in the desert. Texas was another story. There's practically no public land, and the private land is tightly fenced to within a few yards of the road. We tented mostly at RV campgrounds--often on miserable little patches of gravel--but we also stayed in one lovely county-run campground on the Nueces River and a state park or two.

We could have wild-camped here and there as we got further east, but for one reason or another we never did, except for one night by a levee outside Simmesport, Louisiana. The Florida state parks, we thought, were great.

I was a little bit surprised to find that all state parks and RV campgrounds had showers, which meant that we only went unwashed on our wild-camping nights.


Picture
Is Richards in Central Texas or East Texas? The map doesn't say. The guy on the right is our friend Dave, who rode with us from Austin to the Louisiana border.
5. Navigation

The Adventure Cycling Association maps are excellent, but they necessarily cover only a narrow strip of territory. That can make it difficult to detour off the established route or put your location into any sort of big-picture context. Digital natives might be able to do that with a smartphone, but the required zooming in and out made us queasy.

We relied on old-school road maps. The problem, we quickly discovered, is that printed road maps aren't easy to find today. Except for Louisiana and Florida, even the state welcome centers didn't have them.

While wandering around the vast urban sprawl of metropolitan Phoenix, hopelessly off the ACA route, we stopped at a dozen or so convenience stores before two helpful women who worked at one of them rooted through the magazine display and triumphantly came up with a tattered Arizona highway map. But because it lacked a computer bar code, they couldn't figure out how to sell it to us. The store manager came out of his office and rang it up manually, remarking "We haven't sold one of these things in years."

It took us until Mississippi to realize that all drugstores carry a wide variety of printed maps, often in regular and large-print editions. Who uses road maps these days? Old people. Who spends a lot of time in drugstores? Old people. If we weren't so old ourselves, we might have figured that out two thousand miles earlier.


Picture
Is it possible to drive from Florida to Maine without visiting South of the Border? Evidently not. We didn't want to stop there, but did anyway. I even bought a stupid and overpriced hat.
6. Coming and Going

At the start of the trip, Phil and I met at a motel a few hundred yards from the start of the bike route. To avoid handing our bikes over to the airline's baggage handlers, we boxed and shipped the bikes to ourselves at the motel a few days before we arrived, using a service called BikeFlights (www.bikeflights.com).

When we arrived in St. Augustine in the middle of April, we considered flying back to New England (Phil to Maine, me to Vermont), but weren't enthusiastic about having to find bike boxes, transport them to the airport on our bikes, and dismantle and pack everything for shipment there.

I had priced one-way car rentals back in February, and found that it would set us back something like $300 apiece. But because this seemed so much simpler than flying, we looked into it again, figuring that it might be worth the added cost.

Amazement! A one-way rental for an economy car--from St. Augustine to Rockland, Maine--was $3 per day, with unlimited mileage. The guy at the rental company explained that there was always a huge surplus of cars in Florida in the spring, and that it was cheaper for the company to get customers to drive them north than to load them on a car carrier and pay to ship them where they were needed.

It ended up costing us a bit more than that, because we needed to rent an SUV to accommodate Phil's recumbent. But at $16 a day plus gas, it was still a screaming deal.
5 Comments

Team Peugeot Rides Again

10/17/2016

1 Comment

 
PictureThat's me on the left, Tom on the right. His PX-10 has the fancy Nervex lugs, mine has the plain ones. I do wish I had a photo of Tom from back in the day, when he had a spectacular Bill Walton-style nimbus of hair. Sic transit gloria mundi!


In 1976, my old friend Tom marked the end of his stint in the Peace Corps by joining a couple of fellow volunteers on a bike ride from the west coast of Mexico to Guatemala City, in south-central Guatemala.

 A 2,000-mile ride is noteworthy on any kind of bike, but the really remarkable thing about this one is that Tom managed it on his 1974 Peugeot PX-10, still equipped with its original gearing: A 52-45 double chainring setup combined with a 14-15-17-19-21 freewheel. (He did, however, swap the original tubular rims for clinchers.)

How does a person climb mountain ranges on a loaded bike with a 55-inch low gear? The answer, Tom recalls, is with a lot of very hard low-cadence mashing and a little bit of trickery. On one murderously steep mountain road between Saltillo and Monterrey--a stretch known to locals as La Cuesta de Los Muertos, in tribute to  the truck drivers who died while crossing it in winter--they got help from an unexpected source.

While grinding painfully up a particularly steep grade, they were slowly passed by a heavy truck. One of the three cyclists--Tom doesn't remember who--had the inspiration of pouring on burst of power, catching up to the laboring vehicle, and grabbing onto one of the ropes that secured the tarp covering the load. Steering as best they could with one hand, awash in dust and exhaust fumes with bike just tires inches from the spinning truck wheels, they gained an unnerving but pain-free mile or two.

At that point, the grade moderated and the truck picked up speed to the point where it was just too terrifying to hold on. The truck moved on ahead as our heroes slogged along in its wake.

But yes! Some distance ahead the grade steepened again, Tom and friends caught up, and grabbed onto the side ropes until the next flat section. The same sequence repeated itself several times more until Tom--his legs by now utterly played out--just couldn't close the gap with the slow-moving truck and started falling behind.

I wasn't there, but this part of the story always reminds me of the final scene in the 1958 Stanley Kramer film The Defiant Ones: Tony Curtis and Sidney Poitier, as escaped convicts, are running to catch a freight train that they hope will carry them to freedom. Poitier's character pulls himself aboard, but the wounded and exhausted Tony Curtis can't quite grasp his outstretched hand. (The scene starts at 2:08 in this trailer from the film.)

https://www.youtube.com/watch?v=fBrw8dmgarM


Anyway, at this critical point, one of Tom's companions--a massively powerful rider named Jim--went one better than Sidney Poitier by dropping back, grabbing the stem of his bike, and dragging him ahead to the truck.

The descent was easier.


Fast forward to October, 2016, when a mutual friend invited a group of old pals to a weekend foliage-season bike ride at his house in New York state, just across the border from southwestern Vermont. I had just built up a PX-10 of my own from my stash of old parts and a recently-acquired frame, so I proposed to Tom that he and I form a team: If he'd drag his old bike out of the woodshed, I told him, I'd clean it up and knock the gearing down to a reasonable range for an older gentleman.

The old veteran of La Cuesta was looking a little rough. A fair amount of rust was showing through the paint. The original Simplex derailleur hanger had been hacked off the frame a decade earlier, courtesy of a mechanic at a local bike shop who crudely lowered the gearing by bolting on a cheap mountain-bike derailleur and Shimano Megarange freewheel.

But with some grease, new cables, and replacement parts-bin derailleurs (a Huret Duopar in back and a nameless Huret front--not exactly original spec, but at least French-made), it started looking better. A longer spindle, a 42-tooth triplizer with a 32-tooth granny ring on the old Stronglight 93 crank, a 14-34 Suntour Narrow 6 freewheel, and voila! A PX-10 built for hill climbing, no truck required!


1 Comment

The History of the World in Gearing Charts

3/14/2016

0 Comments

 
PictureThis chart now makes my eyes swim, although it wasn't so bad when I was younger. Note that you had to line up the desired cog and freewheel counts with whatever wheel size you were using. The image is from Eugene A. Sloane's Complete Book of Bicycling, published in 1970. I'm not sure where he got it from.
When I first began riding a lot—back in the days when snakes had legs and a ten-speed drivetrain had two chainrings and a five-speed freewheel—I quickly learned to appreciate gearing charts.

At the time, generating a custom gearing chart required going to a reference book and finding a printed chart of gear-inch ratios for all possible combinations of cog and chainring tooth counts. Then you’d write down the values that matched the tooth counts on your own bike.


PictureTrue story: when my daughter was ten or eleven years old, she found my old manual typewriter up in the attic. After I explained what it was and how it worked, she insisted on bringing it downstairs and setting it up on her desk, next to the computer. She spent the next few days excitedly typing out notes and labels of various kinds. “This is awesome,” she told me. “When you write something, it goes right onto the paper. You never have to print anything!”


Finally, you’d assemble those gear-inch selections into a grid, using an ingenious machine—common at that time, as I recall—known as a typewriter.

You could also write it out by hand, although this didn't look so technologically advanced.


PictureOkay, I admit it-- I mocked this up for the photo. I would have used the typewriter, but the ribbon is pretty much shot. Sorry about the sloppy handlebar tape.
I followed the crowd on all this, mostly because it felt kind of cool and the good riders were doing it.

But it actually turned out to be pretty useful. Powering up hills in your 58.4-inch gear—while proudly glancing down at the “58.4” written on the handlebars from time to time—turned out to be a great way to develop a sense of what a 58.4-inch gear felt like, and learn when you’d be likely to need it.

Later, when you moved up to a better bike--or had the local bike shop build up a new freewheel for your existing bike--you’d have a pretty solid basis for knowing what you wanted for gearing. You might, for example, decide that your high and low were about right, but your cruising range was slightly too low. Would going from a 14-17-20-24-28 freewheel to a 14-16-19-23-28 work better? Let's have a look.

(Opens book, checks gearing chart.)

Yeah, that oughta work pretty well.


PictureRegular visitors to this blog, if any, may notice that this chart is recycled from a previous entry about gearing for Eroica events.
I still remember how delighted I was, in the early days of the Internet, when I found Sheldon Brown’s web site. In addition to all kinds of other useful information, it had a feature that let you make your own custom gearing chart by selecting your wheel size and entering cog and chainring tooth counts into a series of little boxes. Push the “calculate” button, and up popped a colorful gear chart like the one at left.

Presto! No more pulling numbers out of the printed gearing chart with a straightedge and magnifying glass! Sheldon’s gear calculator even allowed you to print out a reduced-size chart designed to be taped to your handlebars. This feature never seemed to work, but you had to admit that it was a great idea.

By that time, though, gearing charts were already falling out of fashion. As cassettes replaced freewheels and the number of possible cogs climbed to ten or eleven, the spacing between gear ratios got steadily smaller. There was less need to map out the gearing you wanted, since any old ten-speed cassette would probably contain every gear you’d ever need. The gearing chart, it seemed to me, was headed in the same general direction as the phone book.


So I was pleasantly surprised, a few months back, to stumble upon a new (or at least new to me) gear calculator that’s most convenient I’ve seen yet. You can find it at http://www.gear-calculator.com/ (see screen capture below).

Picture
Instead of keyboarding in the tooth counts you’re after, all you have to do is slide the chainring and cog icons into back and forth along a series of horizontal bars. The resulting ratios change instantly in response. It’s user-selectable for just about every possible wheel and tire size, and it even allows you to calculate speeds across a wide range of cadences.

That input approach saves time and effort, but what's really striking is the way the program displays the output information visually


The screen-capture image, for example, shows the (non-original) half-step-and-granny setu on my old Gitane. The positioning of the pointers for the gear ratios make it immediately obvious that the five ratios you get from the middle chainring fall almost exactly midway between the five from the big ring.

And as any gear nerd know, that's what half-step is all about: It lets you choose between a full step—by advancing one freewheel cog while staying on the same chainring—or a half-step, by shifting between chainrings while staying on the same cog.


Brilliant! A work of genius!

I’ve always liked half-step gearing for the way it squeezes some additional closely-spaced gear ratios out of a five- or six-speed freewheel. But I’ve struggled to explain the concept to others, and the old grid-type chart didn’t help all that much as a visual aid. (Note to old-bike types desirous of social success: never lose sight of the fact that half-step gearing is a subject of surprisingly little interest to the general public.)


The next time someone asks me about half-step gearing—don’t laugh, it could happen—I’ll just pull up this chart and show it to them.

0 Comments

Gearing for L'Eroica, Part II: Triple Cranks

3/13/2015

4 Comments

 
PictureGolly! It sure is nice here in Tuscany!
Are you going to need a triple to ride the Eroica? Hey, don't ask me. Maybe you’re younger and tougher—or just tougher—than I am. But there are a lot of hills and some dirt road. I’d need one if I were riding it.

A triple crank has two small advantages over a double, and one big one. It gives you a few more gear combinations, which is kind of nice, and the jumps between gears are also a little smaller. That’s also kind of nice. But the big reason people switch to a triple is that it gives you at least a couple of gears that are substantially lower than what you could hope to get out of a standard double.

Of course, there’s also a significant disadvantage to a triple, in that shifting is a little fussier. Feeling your way between three front chainrings takes a lighter touch and more practice than just throwing the front-shift lever all the way in one direction or the other, as you can with a double.


Long-Cage vs. Short-Cage Derailleurs
I’m often asked whether converting a double crank to a triple also requires a switch from a short-cage to a long-cage derailleur.

The answer—you knew this was coming—is “it depends.”

Rear derailleurs have two key attributes. The first has to do with the largest freewheel cog they will accept. Many short-cage derailleurs of the 60s and 70s can handle a 28-tooth cog, although some—like the Campagnolo Record or Nuovo Record—top out at 26 teeth.

PictureThe Campagnolo Rally derailleur was basically a Record model with different graphics and a long cage. Most Campy Records will accept an aftermarket cage patterned after the one on the Rally.
The second is something called "total capacity," which measures the ability of the spring-loaded derailleur cage to keep the chain acceptably tight as it moves between cogs of different sizes during shifting.
The capacity of a given gearing setup is simply the total difference between the tooth counts of the largest and smallest chainrings and freewheel cogs. For example, the difference between the largest and smallest rings of a 52-42-28 triple is 52 minus 28, or 24.  The equivalent figure for a 14-28 freewheel is 24 minus 14, or 10. Add the two figures together and you get a total of 34.


If your derailleur has a total capacity of that much or more (judicious use of google should help you find up the manufacturer’s rated capacity of any rear derailleur you’re thinking of using), you’re home free. Provided that your chain is no longer than it needs to be to handle the 52-28 combination of big chainring and big freewheel cog (more on this a little later), it will have enough “takeup” to keep the chain from going slack even in the 28-28 small-to-small combo.

Generally speaking, derailleurs with capacities of 32 to 40 or more teeth are considered to be long-cage, and those with capacities of 26 teeth or fewer to be short-cage. A smaller mid-cage category includes those with capacities of 30 to 32 teeth.


PictureThe "B" adjustment screw is visible just to the right of the derailleur mounting bolt in this back view of the venerable and much-loved Suntour VGT Luxe
"Cheating" on Derailleur Capacity--How and How Not To
But manufacturer-specified capacity figures tend to be pretty conservative. (Their "largest cog" specifications, on the other hand, are usually just about right.) Most derailleurs will take up a bit more slack—typically a tooth or two more—than the spec sheet says they will. You can often pick up another tooth or two by tightening the derailleur’s “B” adjustment screw as far as it will go, so the body of the derailleur is rotated as far back as possible.


The official capacity figure also assumes that the derailleur needs to keep the chain taut at all times, even when it’s parked on granny chainring in front and the smallest freewheel cog in back.

But because we’re experienced cyclists, you and I would never use that combination anyway, since we know that it puts the chain at an extreme angle and causes rapid drive-train wear.

Come to think of it, we would never use the granny ring with either of the two smallest freewheel cogs, given that better-aligned approximations of the same ratios are usually found on the middle chainring.

And if you’re willing to make a firm policy of staying out of the smallest cogs in combination with the small chainring, your derailleur effectively gains a few additional teeth of capacity--enough, perhaps, to allow your short-cage derailleur to work acceptably with a triple crank.

PictureAlthough this setup officially requires a derailleur with a capacity of 30 teeth or more, a careful rider can pare that figure down to 26. Be sure the chain is long enough to handle the 52-32 combination! Although you won't be able to use the 32-14 or 32-16 combinations, note that the 42-18 and 42-21 combinations offer pretty much the same ratios.
Let's say, for example, that you have a nice old Campy-equipped Poghliaghi that's currently set up with 52-42 chainrings and a 14-16-18-21-24 freewheel. (Or call it an old Gitane if you'd rather--the numbers work out the same either way.) Let's further imagine that you have some reservations about powering over the Eroica's hills in such tall gearing.

But wait, happens if you remove the existing inner ring and bolt on a 42-tooth triplizer and a 32-tooth inner ring? Will the existing Record derailleur—which as we’ve seen has a capacity of 26 teeth—play nicely with the resulting 52-42-32 triple?


I’ll cut to the chase here: It will, but with little or nothing to spare, and only if you make sure to stay out of the 32-14 and 32-16 combinations.

The math looks like this: Subtract 32 from 52 to get 20, which is the total tooth spread of the chainrings. Now subtract 18 from 24 to get 6, representing the tooth spread of the freewheel cogs you’re actually going to use with the granny ring. (The 14- and 16-tooth cogs, remember, are off-limits.)

Add 6 and 20 and you get a capacity figure of—who knew this would work out so neatly?—26 teeth, which is the maximum that the Record derailler can accommodate. Note that we're right up against the limit here; going to a 30-tooth inner ring instead of a 32 would let the chain go slack in the 30-18 combination.

If you know the maximum capacity of the derailleur you'll be using, you can use the same simple math to figure out whether it makes sense for the gearing you have in mind, and whether you'll have to forego a cog or two at the low end to make it work.


Don’t Forget the Big-Big
But there’s one important—nay, crucial—rule to keep in mind when making any drive-train changes: THE CHAIN MUST ALWAYS BE LONG ENOUGH TO ALLOW IT TO SHIFT ONTO THE LARGEST CHAINRING AND LARGEST FREEWHEEL COG.

Like the small-small combination, of course, this is a set of ratios you wouldn’t ordinarily use. But Murphy’s law—which states that whatever can go wrong will go wrong—is ignored at one’s own peril. Everyone who spends enough time on a bike will eventually shift into the big-big combo by mistake, no matter how much they plan not to.

And if the chain isn’t long enough to let that shift happen cleanly, one of several things--all of them bad--can happen very suddenly. The chain may snap, and if you’re pounding hard uphill at the time it may pitch you over the handlebars when it does. The too-tight chain may shear the teeth off the big chainring, or blow up the rear derailleur.

An accidental shift onto the small-small combination, by contrast (and this is why cheating on derailleur capacity in the direction of too long a chain is acceptable if you're careful about it) provides no excitement whatsoever. In most cases, you’ll be alerted to the mis-shift only by the faint sound of slack chain rubbing over the drive-side chainstay. Shift up to the next biggest cog in back and the problem goes away, with no harm done except for some imperceptible  wear to the paint.

You Can, But Do You Really Want To?
So am I saying that running a triplized crank with a short-cage derailleur is a good idea?

Not really. The short-cage-with-a-triple approach has the advantage of letting you continue to use your original derailleur. And let's face it, it looks pretty cool. The Eroica is a celebration of old racing bikes, and old racing bikes are supposed to have short-cage derailleurs. Sure, maybe you do have a triple up front, but that's a lot less obvious. You can hardly see the granny chainring behind the two outer ones, can you?

But cheating on derailleur capacity does mean that you'll spend at least some time riding around with excess slack in your chain, since you're sure to unintentionally shift into one of the off-limits combinations from time to time. That carries some risk of your chain derailing, which is inconvenient at best.

And when you come right down to it, the 35.4 inch low in the 32-26 setup charted above isn't really all that low. In fact, if you're running a Stronglight 93 crankset, you can get a comparable low from a double by installing a 37-tooth small ring (see the previous post for more on this).

The bottom line is that the short-cage option probably makes the most sense for staunch Campagnolo adherents, whose 144 BCD cranksets limit them to a 42-tooth small ring in the standard double configuration.

But if you can live with the look of a long-cage derailleur--which will let you use a granny ring of as small as 24 teeth--you can provide your old racing machine with the same low gearing you'd find on a modern touring bike.


4 Comments
<<Previous

    Author

    I'm a chainring czar and editor in Cabot, Vermont. You know, where the cheese comes from.

    Archives

    January 2021
    December 2020
    March 2020
    April 2019
    February 2018
    September 2017
    August 2017
    October 2016
    March 2016
    March 2015
    November 2014
    July 2014
    May 2014
    April 2014
    December 2013

    Categories

    All

    RSS Feed