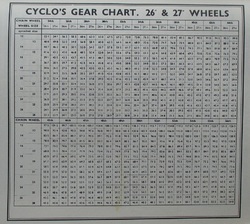
 This chart now makes my eyes swim, although it wasn't so bad when I was younger. Note that you had to line up the desired cog and freewheel counts with whatever wheel size you were using. The image is from Eugene A. Sloane's Complete Book of Bicycling, published in 1970. I'm not sure where he got it from.
 When I first began riding a lot—back in the days when snakes had legs and a ten-speed drivetrain had two chainrings and a five-speed freewheel—I quickly learned to appreciate gearing charts.
At the time, generating a custom gearing chart required going to a reference book and finding a printed chart of gear-inch ratios for all possible combinations of cog and chainring tooth counts. Then you’d write down the values that matched the tooth counts on your own bike.
At the time, generating a custom gearing chart required going to a reference book and finding a printed chart of gear-inch ratios for all possible combinations of cog and chainring tooth counts. Then you’d write down the values that matched the tooth counts on your own bike.
 True story: when my daughter was ten or eleven years old, she found my old manual typewriter up in the attic. After I explained what it was and how it worked, she insisted on bringing it downstairs and setting it up on her desk, next to the computer. She spent the next few days excitedly typing out notes and labels of various kinds. “This is awesome,” she told me. “When you write something, it goes right onto the paper. You never have to print anything!”
 Finally, you’d assemble those gear-inch selections into a grid, using an ingenious machine—common at that time, as I recall—known as a typewriter.
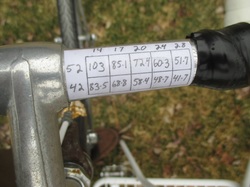
You could also write it out by hand, although this didn't look so technologically advanced.
 Okay, I admit it-- I mocked this up for the photo. I would have used the typewriter, but the ribbon is pretty much shot. Sorry about the sloppy handlebar tape.
 I followed the crowd on all this, mostly because it felt kind of cool and the good riders were doing it.
But it actually turned out to be pretty useful. Powering up hills in your 58.4-inch gear—while proudly glancing down at the “58.4” written on the handlebars from time to time—turned out to be a great way to develop a sense of what a 58.4-inch gear felt like, and learn when you’d be likely to need it.
Later, when you moved up to a better bike--or had the local bike shop build up a new freewheel for your existing bike--you’d have a pretty solid basis for knowing what you wanted for gearing. You might, for example, decide that your high and low were about right, but your cruising range was slightly too low. Would going from a 14-17-20-24-28 freewheel to a 14-16-19-23-28 work better? Let's have a look.
(Opens book, checks gearing chart.)
Yeah, that oughta work pretty well.
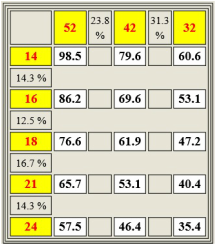
 Regular visitors to this blog, if any, may notice that this chart is recycled from a previous entry about gearing for Eroica events.
 I still remember how delighted I was, in the early days of the Internet, when I found Sheldon Brown’s web site. In addition to all kinds of other useful information, it had a feature that let you make your own custom gearing chart by selecting your wheel size and entering cog and chainring tooth counts into a series of little boxes. Push the “calculate” button, and up popped a colorful gear chart like the one at left.
Presto! No more pulling numbers out of the printed gearing chart with a straightedge and magnifying glass! Sheldon’s gear calculator even allowed you to print out a reduced-size chart designed to be taped to your handlebars. This feature never seemed to work, but you had to admit that it was a great idea.
By that time, though, gearing charts were already falling out of fashion. As cassettes replaced freewheels and the number of possible cogs climbed to ten or eleven, the spacing between gear ratios got steadily smaller. There was less need to map out the gearing you wanted, since any old ten-speed cassette would probably contain every gear you’d ever need. The gearing chart, it seemed to me, was headed in the same general direction as the phone book.
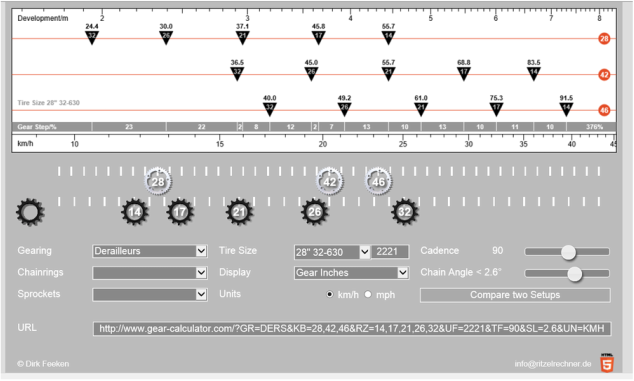
So I was pleasantly surprised, a few months back, to stumble upon a new (or at least new to me) gear calculator that’s most convenient I’ve seen yet. You can find it at http://www.gear-calculator.com/ (see screen capture below).
Instead of keyboarding in the tooth counts you’re after, all you have to do is slide the chainring and cog icons into back and forth along a series of horizontal bars. The resulting ratios change instantly in response. It’s user-selectable for just about every possible wheel and tire size, and it even allows you to calculate speeds across a wide range of cadences.
That input approach saves time and effort, but what's really striking is the way the program displays the output information visually
The screen-capture image, for example, shows the (non-original) half-step-and-granny setu on my old Gitane. The positioning of the pointers for the gear ratios make it immediately obvious that the five ratios you get from the middle chainring fall almost exactly midway between the five from the big ring.
And as any gear nerd know, that's what half-step is all about: It lets you choose between a full step—by advancing one freewheel cog while staying on the same chainring—or a half-step, by shifting between chainrings while staying on the same cog.
Brilliant! A work of genius!
I’ve always liked half-step gearing for the way it squeezes some additional closely-spaced gear ratios out of a five- or six-speed freewheel. But I’ve struggled to explain the concept to others, and the old grid-type chart didn’t help all that much as a visual aid. (Note to old-bike types desirous of social success: never lose sight of the fact that half-step gearing is a subject of surprisingly little interest to the general public.)
The next time someone asks me about half-step gearing—don’t laugh, it could happen—I’ll just pull up this chart and show it to them.

 RSS Feed