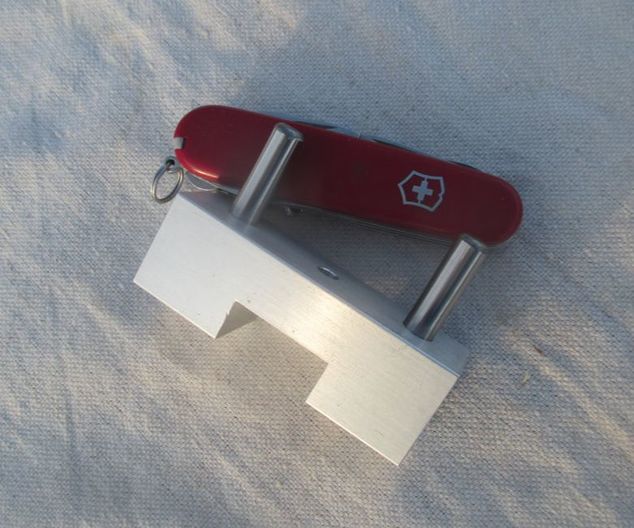
It's the size of a Swiss Army knife, but different in concept: It does one thing very well.
I recently finished final testing of a new tool that I hope will find a place with riders who tour on freewheel-equipped bikes. I can’t be the only one who still does that, can I?
I’m calling it the Freewheel Key. It’s a lightweight, portable tool that makes it easy to remove a freewheel from a hub when you don’t have access to the heavy shop tools ordinarily used for that job. (Bike tourists of a certain age may recognize a family resemblance to a long-extinct tool called the Pocket Pro, although this successor version is stronger, much more versatile, and easier to use.)
Who needs to remove a freewheel by the side of the road?
Mostly, people who have to replace a broken drive-side rear spoke. Given the dished configuration of rear wheels on derailleur-geared bicycles, the spokes on that side are under higher tension--and much more prone to breakage--than those elsewhere. I’ve been scheming about this tool since last spring, when I broke two spokes in the course of a cross-country tour.
At this point I’m going to briefly turn down a side road and say a few words about the difference between cassettes and freewheels, since they’re similar in appearance and often confused with one another.
Cassettes are what you’ll find on most modern bikes. The rear cogs slide onto a splined extension of the hub and are secured by a threaded lockring that’s secured with a fairly modest degree of torque.
(If you want to dig into this a little deeper than I’m going to here, Sheldon Brown has a good tutorial on the subject here:)
Unlike cassettes, freewheels thread directly onto to the hub in such a way that they’re tightened by the force of pedaling. They were standard on derailleur-equipped bikes until the mid-80s or so, when they were largely replaced by cassette hubs. Nowadays, freewheels are standard equipment only on new department-store-quality bikes. But quality replacement freewheels are still available, and there are still millions of fine old freewheel-equipped bikes out on the road.
Removing a freewheel starts by inserting the correct freewheel remover into the splined or slotted body of the freewheel, and securing it with the quick-release spindle and nut.
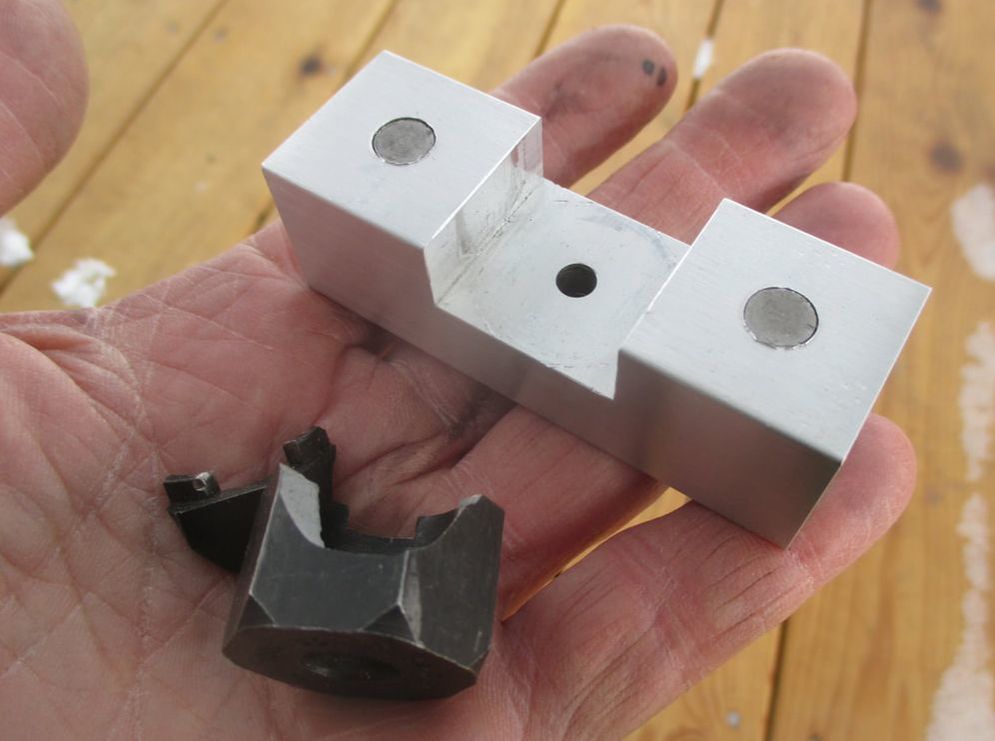
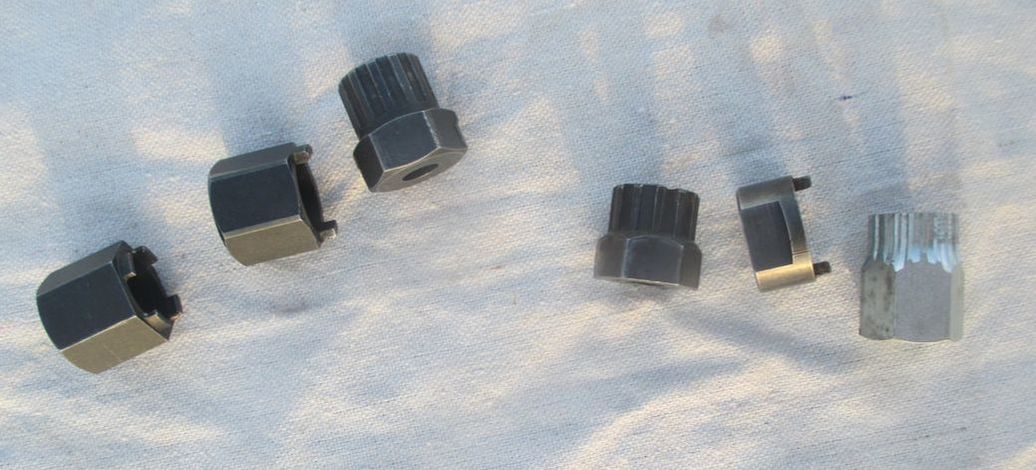 The group of three freewheel removers on the left have 1" hexagonal bodies that are compatible with the fixed jaws of the Freewheel Key. From left to right: a four-prong Suntour tool, an earlier two-prong Suntour, and a splined Shimano remover that fits most freewheels in use today. Grouped at right, three non-compatible removers: a Shimano with a 15/16" base; and old Suntour two-prong with a 7/8" base, and an Atom/Regina remover, also with a 7/8" base. Park Tool, bless them, makes reasonably-priced 1" removers to fit most common freewheels, both old and new. | 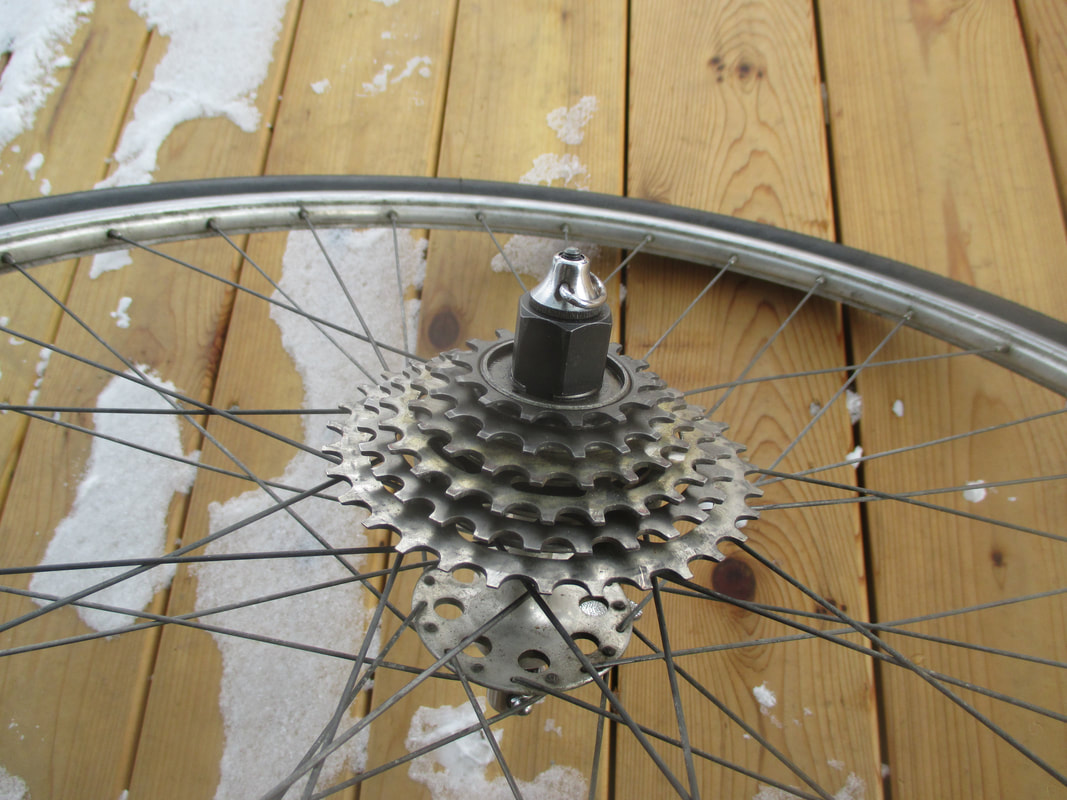 A Suntour two-prong remover temporarily secured to the freewheel body. I like to screw on the spindle nut until it's tight, then back it off a turn and a half so it won't bind when the freewheel starts to loosen. |
In a well-equipped bike shop, that temporary assembly is then turned over so the hexagonal steel remover can be clamped in a solidly mounted bench vise. At that point, the wheel is turned counterclockwise, with the wheel itself providing the mechanical advantage needed to back out the freewheel. In a shop that lacks a vise, the mechanic bears down on the remover with a wrench until the freewheel begins to unscrew from the hub.
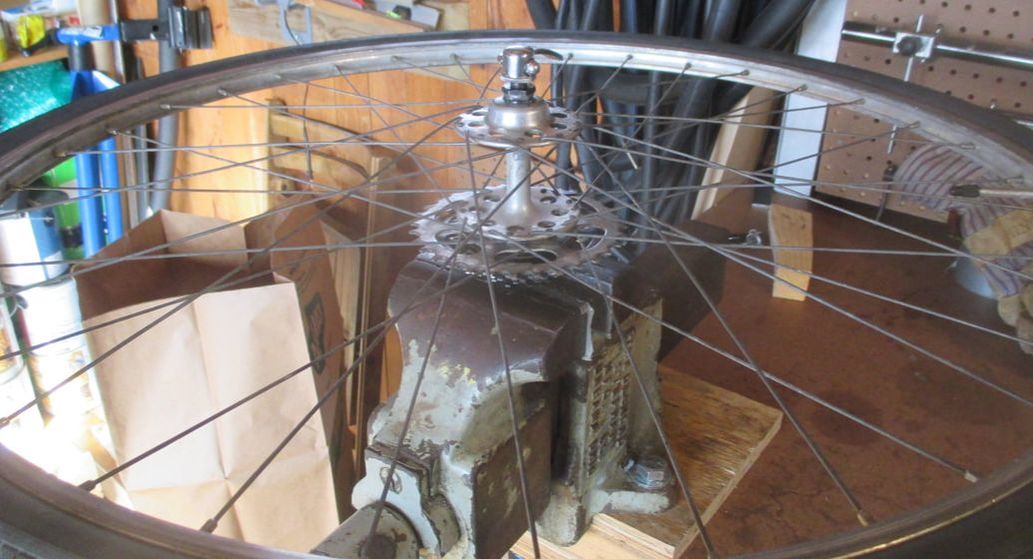
When it comes to removing a freewheel in the shop, the big-vise method beats the big-wrench method every time.
Either way, that takes force, and often plenty of it. A freewheel that’s been hammered home for a few thousand miles by a strong rider with low gears--especially if the threads weren’t coated with anti-seize or grease when it was last installed--can be a stubborn thing indeed. If you’re using the wrench method, a 12-inch adjustable is about the smallest tool that will give you any chance of success. A 15-inch adjustable is even better.
More often than not, either one will have to be extended with a cheater bar of some sort. Before my shop had a bench vise, I used to keep a two-foot length of galvanized water pipe handy for use as a freewheel persuader.
Fortunately, once it starts to turn, even a very tight freewheel will usually keep turning easily. After the first rotation or so, it’s often possible to remove the spindle and turn the remover the rest of the way by hand. (If you leave the spindle in place, remember to loosen it incrementally as the freewheel backs out, or the spindle nut will bind against it, possibly stripping the nut or breaking the spindle itself.)
Okay, detour complete. Turning back onto the main road now.
So what happens if you snap a drive-side rear spoke or two on a remote stretch of road somewhere in West Texas? You’re not going to have a vise or a big wrench and cheater bar in your tool kit then.
But who needs them? Take off the rear wheel, insert the freewheel remover, position the Freewheel Key, and thread the spindle into it. Now engage its hardened steel dogs with some nearby element of roadside infrastructure--a steel signpost is ideal, but anything from a steel guardrail support to chain-link fence or storm-drain grate will work just as well--and rotate the wheel counterclockwise, exactly as in the bench-vise method.
The pictures below probably explain that better than words do.
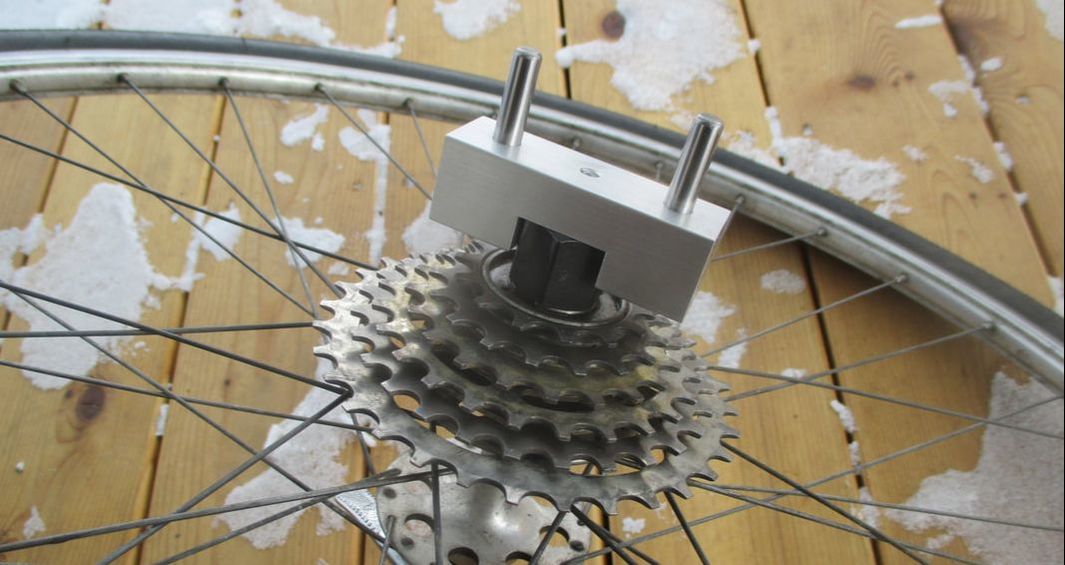
Thread the spindle into the Freewheel Key to hold it and the freewheel remover in position. Some older French spindles use non-standard threading (vive la France!), but because the hub doesn't care how the spindle is threaded, they can be replaced--if only for the duration of that cross-country tour--with any M5x0.8 threaded spindle of the same length.
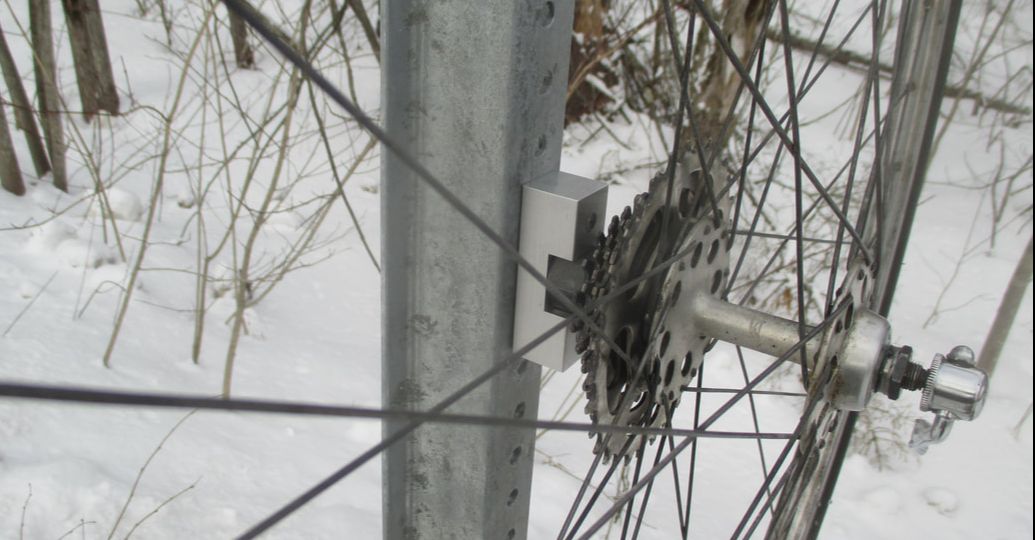
Plug the steel dogs that extend from the front of the Freewheel Key into the perforations on any square- or channel-section signpost, and turn the wheel counterclockwise while pressing it firmly against the post--a motion that will be familiar to anyone who has opened a child-resistant bottle. When you think about it, the setup corresponds closely to the vise-removal method pictured earlier--the aluminum body of the tool substitutes for the vise, the signpost for the workbench, and the cylindrical steel dogs for the big bolts that secure vise to bench.
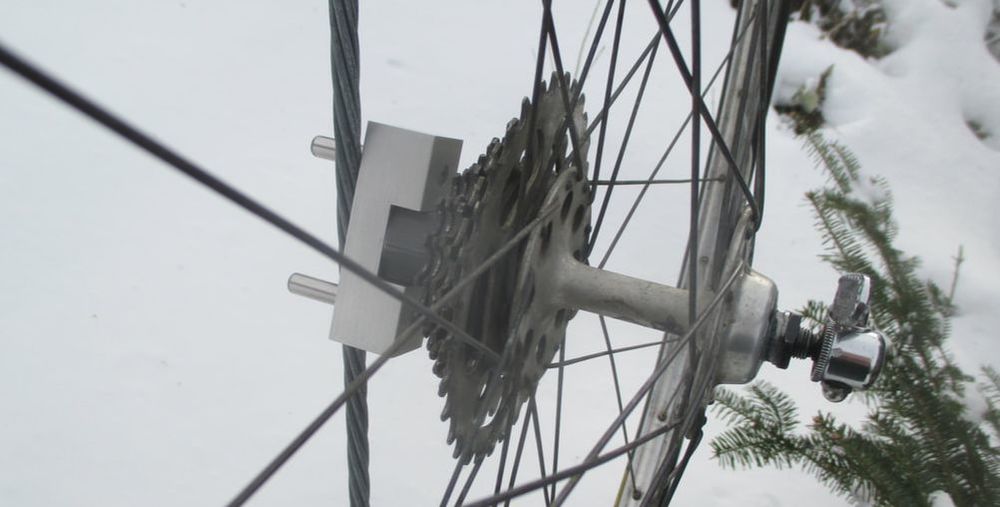
The press-and-turn method also works with a utility-pole guy wire, or almost any other immobile steel object that's strong enough and fits between the dogs. This photo and the preceding one, incidentally, also show why no one goes bike touring in Vermont in February.
Thanks to its 7075 T6 aluminum body, the Freewheel Key weighs in at a fairly svelte 5.2 ounces, or about 150 grams. Even so, it's a tough little beast. I’ve broken two freewheel pullers and destroyed one wheel while trying to see what it will take to break the tool itself--and I still haven't managed to break one.
“Wait a minute,” I can hear someone say. “The alloy body may be almost as strong as steel, but even heat-treated 7075 aluminum is quite a bit softer than steel. What about damage to the aluminum where it bears against the steel freewheel remover?”
In fact, the aluminum does wear at that interface--although much too gradually to make any practical difference. In working with the prototypes, I’ve found that two dozen of cycles of as-tight-as-humanly-possible freewheel tightening and loosening leaves faint marks on the aluminum jaws, but it doesn’t come anywhere near damaging them in terms of function. (Engineers refer to this type of wear as “fretting,” which admittedly does sound worrisome.)
I suppose that a busy bike shop would wear one out pretty quickly by using it in place of a bench vise. But it's not made for regular shop use. Normal roadside use won’t faze it in the least. Even if you’re the worst spoke-breaker in the history of bicycle touring, one Freewheel Key should last you for several lifetimes.
This well-used prototype tool shows a few wear marks from the pressure of the steel freewheel remover. But look which one broke first.
I’ve resisted the urge to beautify the tool in any way. Starting with heavier bar stock and CNC machining it to a swoopy, graceful shape would have doubled or tripled the cost without adding anything to the performance of the finished product. There’s no polishing or anodizing. It’s an emergency tool--simple, effective, and as low in cost as I can make it.
I like this thing a lot. The prototype pictured above has taken up permanent quarters in my touring tool kit.
Not everyone, I realize, will see things the way I do. I can hear the contrarian view already:
"Be serious! One hundred and fifty grams?" [Is this the same hypothetical person who was asking about fretting a few paragraphs back? It could be, but I think it's someone else.] "That's half again as much as one of those big Snickers bars! You're going to haul that much weight around when you're not even sure you'll need to use it?" [shakes head in disbelief]
Too true! The hypothetical person is right. It does weight as much as one and a half Snickers "2 to Go" candy bars (the kind that theoretically serves two, but that bike tourists invariably eat all at once). And that doesn't include the freewheel puller itself, which adds at least another ounce.
In short, this is not a tool for riders who think about their touring loads in terms of grams. It's a tool for people like me, who place a high value--perhaps an overly high value?--on mechanical self-sufficiency.
And here’s the really big question: How many mechanical-self-sufficiency-valuing bike tourists out there value mechanical self-sufficiency enough to actually buy one of these things? At a price that pays for making them here in Vermont?
I guess that’s two questions.
I’m going to take the direct approach to finding the answers. A small production run is in the works, and the first Freewheel Keys are going to show up in the Store section of this website sometime in the next few weeks. You won’t be able to order one until then, but I'd be happy to answer any questions you might have in the meantime.
 RSS Feed